Showing posts with label brands: nicole by opi. Show all posts

05 September 2013

Swatch: Nicole by OPI Gumdrops Lemon Lolly


Good news everybody! Wait can I use that? I'm using it either way! Once upon a time (aka last week), I learned that Nicole by OPI had put out two exclusive polishes for their Gumdrops collection. That's A Mint and Lemon Lolly. Now, immediately after discovering that Lemon Lolly was a yellow texture polish, I searched the net for information only to discover that this color was exclusive to a store (Shoppers Drug Mart) in Canada. That's A Mint, however has been seen at CVS with the Gumdrops display. I've seen it myself as well.

I had e-mailed Nicole by OPI to see if they would, by chance, release Lemon Lolly state side in the future, there wasn't confirmation from the brand yet, but in the e-mail it said that That's A Mint would be available at Target and CVS (already there), and that Lemon Lolly may be released in the upcoming months.


Well, confirmation time is now! I went to Target today to pick some things up, and there at the beauty section is a WONDERFUL display of Nicole by OPI Gumdrops. What do I see? Lemon Lolly! Truth be told, I nearly ran to the display to snatch it up. They must have just put the display out today because I had been there yesterday in search of something non-beauty related and no such display existed. 

So if you are looking for Lemon Lolly, do check Target or possibly CVS in the next few weeks.

Swatch time!
Nicole by OPI Gumdrops Lemon Lolly
Vivid camera setting
Lemon Lolly is exactly as the name sounds. It is a beautiful yellow texture polish with gold micro-glitter mixed in. The finish itself is a shimmer matte texture. 

Directions: Apply base and two coats of color. Do not use top coat.

Application: Perfect. I had absolutely no issues with this. The first layer starts off a tad sheer, with the gold coming out more. The second coat, it became very opaque. Two coats only.

Nicole by OPI Gumdrops Lemon Lolly
Natural camera setting


Nicole by OPI Gumdrops Lemon Lolly
Macro - natural setting
Overall Verdict: I absolutely LOVE this color! No issues with the application. I'm just so excited to actually have it in my hands finally! What would go perfect with this color is a lovely lime texture polish now :D

Price: Varies. At Target I purchased this for $7.04(USD)

Availability: Target and possibly CVS (US), Shoppers Drug Mart (Canada)

23 August 2013

Swatch: Nicole by OPI Gumdrops My Cherry Amour


I have in my possession another polish from Nicole by OPI's Gumdrop collection, bwhaha! ... I think I'm starting to become obsessed with this. Anyway, to be honest, my Mother picked this one out (note if you missed it, she's color blind to the point of only seeing black, grey & white), she was going by the name, My Cherry Amour and believe it would be a vivid red textured polish. The lighting in the store actually mad it out to be a red. Not exactly a cherry red.

Nicole by OPI Gumdrops My Cherry Amour

My Cherry Amour isn't exactly a "cherry" color. It's more of a fuchsia infused red, with fine holographic and fuchsia glitter.


16 August 2013

Swatch: Nicole by OPI Gumdrops Cinna-man of My Dreams


I have my July favorites on the way, things have been crazy at work, which depending on how you view it can either be good or bad. Either way, I finally got a new cell phone, and of course after getting one, I discovered that the back casing of my old one, had begun to melt apparently. Shock shock!

Besides that though, I purchased another one of the Gumdrops from Nicole by OPI. This one was the one I had been debating between when it came to Candy is Dandy.

Nicole by OPI Cinna-man of My Dreams
Cinna-man of My Dreams is an unique color (to me at least, I don't have anything like it in my collection!). It is a brick red-pink that has shades of mauve, brown, and light pink. The glitter is basically the main part of the texture, there's no hologram glitters or hexagon glitters either. This is the best way to describe the color.

Directions: Apply base and two coats of color. Do not use top coat.
Nicole by OPI Cinna-man of My Dreams
Vivid setting on the camera.
Application: Easy. Two coats for this and it was completely opaque. Actually, when you apply one coat, you get the true color of the polish, I think. I actually like how one coat looks, two coats makes it perfect for fall.
Nicole by OPI Cinna-man of My Dreams
Natural setting on the camera
 
Nicole by OPI Cinna-man of My Dreams
Close-up Natural Setting
Overall Verdict: I absolutely adore this color. Both one coat and two coats. To me it's a unique color, and doesn't match anything I have.  Definitely happy that I went back and got this color. 

Price: Varies, I purchased this for $6.94, but the price can go up to $8.00.
Availability: Anywhere that Nicole by OPI is sold.

30 July 2013

Swatch: Nicole by OPI Gumdrops Candy Is Dandy


Steering away from my neon madness (have I lost my mind?!), I finally painted my nails a different color! I honestly couldn't wait to the Nicole by OPI polish out once I had purchased it.

I was beyond excited to find out that CVS and Harmons had the Gumdrops collection out, because I swear the stores around me just don't get collections. Or they get them five months later then they stay in the stores for five months. There are other collections!

Gumdrops is Nicole by OPIs answer to texture polishes. I actually think the name if appropriate because the finish makes it appear as a gum drop.

Nicole by OPI Gumdrops Candy Is Dandy
Candy is Dandy
The first one that I got from the collection is Candy is Dandy. It's a cross between a barbie pink and a baby pink; with tiny bits of glitter, as well as hexagon glitters.

Directions: Apply base and two coats of color. Do not use top coat.

Honestly, I applied a top coat over this when I swatched it on my nail wheel and it didn't do anything. It didn't change the texture, nor did it smooth it out. Then again, I only applied one top coat.

Application: Easy, but this one (as far as I know) is on the sheer side. Two coats and I can still see the free edge of my nails. I would definitely say, a third coat could be applied, or possible a thicker second coat.

Nicole by OPI Gumdrops Candy Is Dandy
Vivid camera setting
Nicole by OPI Gumdrops Candy Is Dandy
Tried to get the camera to un-focus on the nails to show the glitz.
Overall Verdict: I love the fact that there is glitter mixed in, although it's suppose to dry to a matte finish, it STILL looks shiny and sparkly due to that little added touch. Definitely plan on getting a few others from the collection :D

Price: Varies, I purchased this for $6.94, but the price can go up to $8.00.

Availability: Anywhere that Nicole by OPI is sold.

27 July 2013

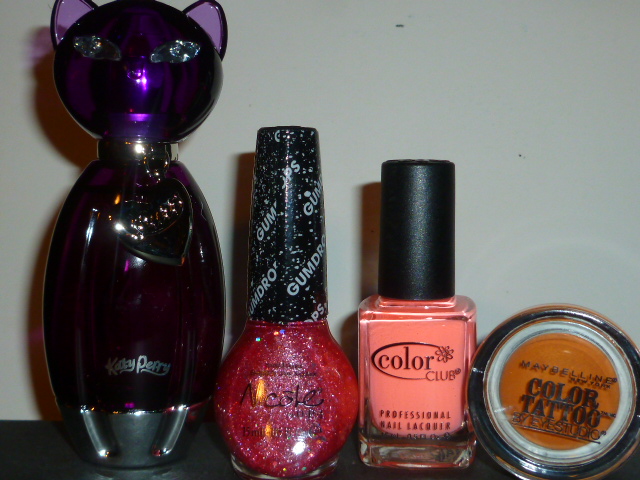
Haul Ahoy!: Could a day be anymore Purrfect?


This is a small haul from yesterday (Friday), I normally prefer not to do posts about hauls, but I was definitely excited about this one! I just couldn't resist. So, this will be a quick post.

Two I purchased at Target, and the other two from Harmons.

Maybelline Color Tattoo 24hr Cream Gel Shadow in Fierce and Tangy ($2.97 - Target)
Color Club Girl About Town in East Austin ($4.29 - Harmons)
Nicole by OPI Gumdrops in Candy is Dandy ($6.94 - Harmons)
Katy Perry Purr Perfume ($8.84 - Target)

The Katy Perry perfume was a major find for me, it was at one of the Clearance end caps on a back aisle. So if you're looking for that perfume, in particular, definitely check out any of the end caps Target has.

08 July 2013

Swatch: Half Charming, Half Alarming from Nicole by OPI


 Freshly put out onto the shelves at my local Walgreens, was the holy grail that is the Tink Collection from Nicole by OPI.  Can I just tell you all that when I discovered that Nicole by OPI was coming out with a Tink line, I literally squealed while I was at work. Whoops! Yes, I was THAT excited.

So upon coming across the display that hadn't been touched (at least it didn't look it), I went back and forth (this seems to be a reoccurring thing with me), trying to decide which to purchase first. Sadly, the other colors reminded me of other polishes that I have, I'll most likely go back and purchase them anyway though!

The one that I picked first was.... Drum Roll! Half Charming, Half Alarming!

Nicole by OPI Half Charming Half Alarming

Best way to describe this color is that it's alarming! Haha, not really. Definitely in the warm family, but I'm on the fence as to whether to say this is a terracotta colors or a tomato red color. It isn't quite red, but not orange either, it's definitely a mix of the two. Terracotta Tomato perhaps? It's a color that I don't recall having, not to mention it gives you a very polished look.

Formula: This is where I fall into the iffy area. I love Nicole by OPI polishes, but I'm not sure what happened with mine. Perhaps it was because of the heat? This is a sheer formula, I want to say it's jelly, but not jelly. It was also being a bit of a fuss-pot with applications, occassionally doubling over an area would cause balding to occur, or drag marks (maybe the brush is a mini car). It dries down to a semi-matte finish. Well actually, the first layer was matte, the second layer had minor gloss to it. Easy-peasy clean up though.

In the swatches below, I only used 3 coats. I definitely could have done a 4th coat to get it fully opaque, as I still see some of the white tip of my nails.

Psst, ignore the dryness below, I forgot the cuticle oil ;x

Nicole by OPI Half Charming Half Alarming
Camera setting set to Vivid

Nicole by OPI Half Charming Half Alarming
Camera setting set to Natural

03 May 2013

Press Release: Neon Mini Kits from Nicole by OPI


Nicole by OPI Announces Two New Limited Edition Neon Mini Kits, the Brand’s First Neon Lacquer


Nicole by OPI launches its first neon nail lacquer with two limited edition mini kits. Scandalous! Neons includes vivid shades of blue, purple and pink while the Notorious! Neons includes vibrant shades of green, fuchsia and orange.

Each Neons kit includes a special white base coat, to be applied before adding color, allowing true neon pigments to pop. “These kits offer the hottest hues in a mini size to complement summer styles,” explains Suzi Weiss-Fischmann, Nicole by OPI Executive VP & Artistic Director.  “Think of your nails as a blank canvas.  With these color combinations, there are endless options for creating works of art.”
Nicole by OPI Scandalous! Neons
In addition to the white base, Scandalous! Neons includes: Blue Neon (this blatant blue is deliberately belligerent), Purple Neon (this attention-seeking purple is a real publicity hound), and Pink Neon (this pink's purpose is to provoke your senses).
Nicole by OPI Notorious! Neons
Along with white base, Notorious! Neons includes: Green Neon (this gossip-stirring green is the talk of the town), Fuchsia Neon (this fuchsia is famous for being unabashedly bold), and Orange Neon (this outrageous orange doesn't know the meaning of meek).

“The shades included in both sets are perfect for accessorizing fingers and toes with bright pops of color,” adds Weiss-Fischmann. “The first step is to apply the white base coat followed by the desired neon shade; finish with one coat of Nicole by OPI Top Coat Plus to achieve intense neon color with a glossy finish.”

Nicole by OPI formulas are long-lasting, fast-drying, and salon-quality.   Scandalous! Neons and Notorious! Neons mini packs will be available in stores beginning May 2013 for $10 each at retailers including Meijer, CVS, Duane Reade, H-E-B, Kroger, and ShopKo.  Top Coat Plus will be sold alongside the kits for $7.99. In Canada, the kits will be available for $12.50 each and Top Coat Plus for $10.99 at Loblaw, Jean Coutu, Rexall, London Drugs, and Shoppers Drug Mart.  

For more information, visit nicolebyopi.com. Follow Nicole by OPI on Twitter @NicoleByOPI and become a Facebook fan!

16 March 2013

Holiday: St. Patrick's Day Inspired Nails

With St. Patrick's Day just around the corner, I wanted to get this up before I change my nails tomorrow (Saturday) night with another St. Paddy's Day nail.

I actually ended up doing this around 1am in the morning, a bit delirious so I didn't think of doing a still photo tutorial, but it isn't difficult AT ALL. A quick note, I have always done free hand nail art/design. It's something that I love doing, and have been doing for 11 years. Oddly enough, my right hand normally comes out 10x better than my left, I'm right handed though. It's a quirk of mine.

And can I just say that, my pinky has a mind of it's own? Seriously, it doesn't want to line up with the rest of my fingers. Apparently, it wants to go to it's own drum beat and go off to left field. I'm working on it though.


28 February 2013

Monthly: February Favorites

It's that time again. Monthly favorites!

I did this as soon as I got home from work today so that I didn't forget. I also decided to do this post a little differently. Not too different, but this won't be a photo based post.

Off topic note, I wanted to thank everyone who has visited this blog. THANK YOU! Beauty Parfait has reached a little over a 1,000 page views in two months (I'm not sure how good that is in the beauty blogging world, but it works for me!), I'm entirely grateful to those of you who have visited.

Back on topic, onward we go!


Urban Decay  Get Baked palette. I actually rediscovered this palette after going through my make-up stash. I've used it mostly through the month of February for work. I'm uncertain, but I do believe this is now discontinued. Not terribly sure. It came with a mini primer potion as well as a 24/7 eye pencil.

Tarte Amazonian Clay Shimmering Powder in Champagne. I got this in a gift set that I purchased. Another product that I rediscovered this month that I had, when I was searching for a highlighting powder.

Rimmel London Match Perfection Concealer in Fair. I've only been using this for less then a week (still counts right?) and I love it! I will be doing a review later.

Nicole by O.P.I. Scarlett from the Selena Gomez Collection. I searched all over the place for this polish and when I finally found it, it was the only color I'd wear. I actually received several compliments on it.

M.A.C. This one is an oldie but goodie. Viva Glam Cyndi I (discontinued). Very few reds that I can wear out there that don't make me look like a vampire. This was, yet again, another rediscovery.

Bath & Body Works Love Love Love. I have the lotion at work, which I use constantly. For some reason this month I've been reaching for this one the most out of my perfumes/body sprays. It's a light scent and not over powering at all.


I didn't include prices in this post because I didn't believe it was that important. If anyone does want to know the prices, please feel free to leave a comment.

16 February 2013

To Dupe or Not To Dupe: Scarlett vs. Lisa

I've been attempting to come up with a nice catchy phrase to start my posts off with, so far, I've been failing at it. 

My nails have been bare for an entire day which is a shock (hello stain-age!), but I'm contemplating on dying my hair which is why I haven't done anything yet.

Besides that, as the title of this post says, this is a dupe post! 

After searching high and low for the new Nicole by O.P.I. Selena Gomez collection and only finding the glitter collection at stores, I lucked out yesterday and found the rest of the collection! The only color that I've been dying for is actually Scarlett. CVS had only one bottle of it left, so I snatched it up without even thinking about it.

Coming home though I noticed that Scarlett is rather similar to Zoya's Lisa.

First off, I apologize in advance for the photos. I took all of them with my Lumix camera which I've had for a while, but never really used, that is until yesterday. I discovered the exposure setting (yay!) so the photos don't appear so dark with the flash.


Now I wouldn't say these are exact dupes, they are similar though. Lets start off with Scarlett first.

I want to quickly note that the base coat used was my trusty Revlon Post Trauma Nail Treatment. I did not use a top coat on either swatches.

Although the name is Scarlett (if you're familiar with Selena Gomez then you'll know the reasoning for the name), this is a far cry from a red. I would definitely say that this is more of a raspberry pink, possibly on the cool side. To me it is a gorgeous color.

Upon swatching it, I noticed that the formula is on the sheer side. The first coat took a little to get it even, as there was slight balding (the color pulling away from the areas on the nail care of the brush). It took 3 coats to get the color to become opaque, in fact I'd go as far as possibly applying a 4th coat, as to my eye I could still see part of the nail tip.

Next, Lisa.

This is the color I actually wore on Valentine's Day. Zoya's website describes the color as such, An iridescent combination of deep raspberry pink, bright candy apple red and subtle gold tones in a dazzling sparkle finish. In my opinion Lisa leans more towards red than pink, definitely not a true red though because you can see the subtle pink and gold tones to it in natural light (majority of my photos are taken at night due to my work schedule).

With Lisa, it was opaque after 2 coats. The application being thicker and more even.

Comparison.

It might be difficult to tell with the photo, as I was still figuring out the settings on my camera, but Scarlett definitely photographs with more of a pink tone compared to Lisa. With Lisa, the pink tone is there, but not as noticeable. As I mentioned before Scarlett took 3 coats (a fourth could be applied), while Lisa only took two for full opaqueness. The drying time, also was different. Scarlett taking much longer than Lisa. And with Scarlett I also used. Zoya's Hurry Up drops. Both have shimmer, although Lisa seems to sparkle more, even without a top coat.

Overall result? I love both colors, but I gravitate towards Scarlett more due to the pink raspberry color that the polish is. It's eye catching to me.

Would I call them dupes? Not quite. They are very close though, perhaps if one isn't a nail polish addict (is there a nail polish anonymous group I could attend?), they probably wouldn't notice the difference.

Price Range: Nicole by O.P.I. range varies depending on where you purchase the polish. I bought Scarlett at CVS so the price was $7.99. Zoya polishes are priced at $8.00 on the Zoya website.


Disclaimer: Products mentioned in the post were purchased by myself.

31 January 2013

Monthly: January Favorites

Took me a little while to put this together, but I'm finally done! This is mainly a "picture" post, it's pretty much self explanatory. All the items listed behind the read more, are items that I have been using constantly through the month of January. Hopefully the read more works below. 


30 January 2013

Weekly Manicure: Strobe Rose

Being last night I posted my manicure from last week, I figured I would post my very current manicure (newly done last night). Let me just put it out there now, for me to do just plain nails (aka one nail polish and only one), I'm mighty bored then, or indecisive with what to actually do.

I may do a photo tutorial for this one later one because I loved how it came out. It was purely just me grabbing polishes from my stash and just winging it.

(l-r) Steady as she Rose, Back in my Gloria Days..., Strobe Light
Base coat used Revlon's Post Trauma Nail Treatment.

First I did three coats of O.P.I. Steady as She Rose (Pirates of the Caribbean LE). I was just going to do two coats, but those two appeared streaky and uneven for me, so a third was needed. I did let each coat dry in between or at least until they were semi-dry for the next coat. The third coat I allowed the polish to dry even more being I was going to use the sponging technique.

Next I used Nicole by O.P.I. Back in my Gloria Days... (Modern Family LE) for the sponge gradient. This polish is on the thin side so it required a bit of layering to get it opaque enough). I lost count of how many layers it took after 2. Trial and error, I discovered after so many layers of polish, don't continue to use the same side of the cosmetic sponge, the gradient effect is slightly lost on my right hand because the polish was becoming thicker on the sponge.

Clean up around the cuticles was next, sponging can be messy sometimes.

Second to last, I promised not to do an over kill with Sally Hansen's Strobe Light (seriously, I love this polish!), so I limited it to my ring fingers for accent. I believe it was the right touch. Only one layer used.

Lastly I topped everything off with Inm Out the Door top coat.

End result?


19 January 2013

Weekly Manicure: Goldeneye Days

Did my nails on Thursday night, so this is really quick and easy. Not much explanation needed. Just that I wanted to wear two different colors and couldn't decide on which, so easy way out, wear both :D

Nicole by O.P.I. Strengthener Plus as the base coat (2 coats).

Used three coats of Back In My Gloria Days... (Modern Family Collection) on the pink, index and thumb of both hands. Three coats of O.P.I. Goldeneye (James Bond: Skyfall Collection) on the ring and middle finger of both hands.

Clean up around the cuticles. 

Inm Out The Door as the Top Coat.

The Results?

The polish cracked on my middle finger while I was at the store earlier. Boo!


Disclaimer: Products mentioned in the above post were purchased by myself.

12 January 2013

Dupe Alert! Back In My Gloria Days...

I figured I wouldn't get my hands on any of the Modern Family polishes from Nicole by O.P.I. until 2 months after the collection was released. Lucky me that my local Target ($7.04) actually had a full display. Most of the polishes in the collection I have polishes that are either exact dupes or close to (this even came from my Mother!). I wasn't sure about one though. Back In My Gloria Days... I couldn't recall if I had a dupe for this or not, so I ended up getting it.

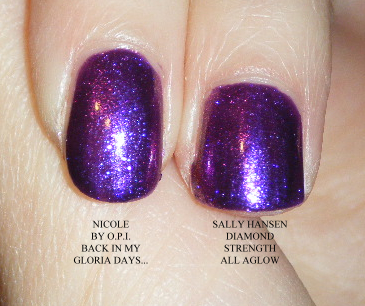
When I got home and went through my nail polish collection (and there shall be a post about that), I did find a dupe. Sally Hansen's Diamond Strength polish in the color All Aglow comes across, in my eyes, as a spot on dupe.

Back In My Gloria Days... vs. All Aglow
Back In My Gloria Days...
Diamond Strength in All Aglow
It's hard to tell in the bottle because of how the Nicole by O.P.I. is shaped, Back In My Gloria Days... comes across as being darker because of this, but that's not the case.

Taking the brushes out of the bottles, Back In My Gloria Days... appears to be a bit darker, with a bluer shimmer, while All Aglow comes across purple with a pinkish blue shimmer.

And with that in mind, onto the swatches!

I apologize for the messy swatches, but I did these quickly (ignore the wonkiness that is my middle nail). Both have two coats over the same base (Revlon Post Trauma Nail Treatment), with no top coat. I had no trouble with application, it just depends on how much you get onto the brush. I truthfully can't see much of a different between the two. Perhaps Back In My Gloria Days... may have a tad bit more blue sheen due to the flash, but that could also be how I have my nails angled.

So if you can't get your hands on Back In My Gloria Days... from the Modern Family collection, may I then suggest Diamond Strength in All Aglow for a dupe.

Disclaimer: Products mentioned in this post were purchased by myself.

10 January 2013

Weekly Manicure: Charismatic Light

Figure I'd kick off a weekly series being I tend to switch my polish up on that type of basis. Save for my New Year's nails which lasted from 12/30 to 1/7, I think that's a record for me with polish.

Originally, I wasn't going to make a post with this, but I got so many compliments at work with the combination, so why not.

(L) Charismatic, (R) Strobe Light
For my base coat I used my Nicole by O.P.I. Strengthener Plus. This time around I applied two coats rather than just one.

I let both coats dry, then applied two coats of Revlon's Charismatic, which is a shimmery apricot color. Allowing both coats to dry I then applied my favorite, Sally Hansen Xtreme Wear in Strobe Light.

Lastly, I used Inm Out The Door as my top coat. I probably could have done two coats of it as the top doesn't feel very smooth. I can tell there's glitter from Strobe Light trying to break through.


End Result.

Disclaimer: Products mentioned in this post were purchased by myself.

03 January 2013

New Year's Manicure

I'll be honest, I wasn't sure what to post first after the introduction. Only one thing I could think of, my New Year's manicure. Now I apologize in advance for the photo quality. I'm still trying to figure this out with lighting, background, etc. And please, if you have any tips, feel free to comment!

Freshly taken December 30, 2012

Loves Me Not

What I haven't photographed are the polishes I use for my base and my top coat. After prepping my nails, I applied a new base coat; Nicole by O.P.I. Strengthener Plus which I actually got from a store called Five & Below for $3.00

Next came the base polish, Sally Hansen Complete Salon Manicure in Loves Me Not. I'm not actually sure if this is still available any longer or not as I don't see it on the website, I also bought this when it was on clearance at Target. I applied two coats to make sure it was opaque. The one thing I did notice with the first application was that there was slight balding (mainly by the cuticles) depending on how much product was actually on the brush.

Going Platinum
After letting that dry, I contemplated between sponging on the tips a gold or a silvery color. I ended up going with the silver-ish color instead. I used from Fergie's line from Wet n Wild, Going Platinum. In my opinion, this color is absolutely gorgeous, not a pure silver, it seems to have a gold tint to it as well as silver, it just depends on how much you layer on. I used a cosmetic sponge to get that onto the nail, trying not to go all the way down the nail. I believe I sponged on two coats, the second coat I tried to concentrate closer to the tip of the nail. In my experience, this polish can be rather opaque, especially with sponging onto a dark color. Getting a gradient effect can be achieved providing you have a light touch (which I didn't because I didn't know how this was going to work before I started on my nails).
Strobe Light

Before the final touch, I cleaned up around my cuticles with nail polish remover (with acetone) and an EcoTools eyeliner brush (love this method instead of using a Q-Tip).

Finally, the polish that I've been in love with ever since I picked it up near the price scanner at Target (yup, that's exactly where I found it). Sally Hansen Hard as Nails Xtreme Wear in Strobe Light. No words can describe how beautiful this polish is. It seems to have micro-fine glitter that comes across as mauve/pink in the bottle with larger flecks of glitter mixed in. The larger flecks though, are holographic pieces. No matter how many photos I took of this polish, both on my nails and the bottle alone, my camera couldn't do it justice. I applied one thin layer all over the nail, then applied a thicker layer over Going Platinum.

Last but not least, I applied my top coat of choice Inn Out The Door. I actually prefer this top coat over Poshe which I used to use. Preforms the same exact way and the price, in my opinion, is better (between $3.99-$4.99 depending on where you look). This is all personal preference though.

It's now past midnight where I live on January 3rd and the manicure is still holding strong, no chipping has occurred, just a bit of nail growth and I'm not even sure if that's visible.

Taken on January 3, 2012
So, there's my first real beauty post. Hopefully it wasn't long.

Thank you for stopping by!
Related Posts Plugin for WordPress, Blogger...