30 May 2013

Review: Rimmel London Fix & Perfect Pro Primer


Not too long ago (month, month & a half maybe), I set out to find another face primer after I had a reaction to the previous one that I had been using. Being careful to check what was listed under the ingredients, I finally found one!

I went back and fourth between a few primers while I was at Target one night, and settled on Rimmel London Fix & Perfect Pro Primer 002. I was actually going to get 001, but it had parabens listed, plus it had a tint to it. I wasn't sure if it was an actual tint or not, but I put it back down after reading the back. 

So, the question is, how does the primer fair? The claims for this is that it is a 5 in 1 primer, but is it really 5 in 1?

Review time!

29 May 2013

Review: Own Refining Moisture Night Cream


After struggling with my latest manicure, which I think I finally got right. Although, still not terribly thrilled with the turn out =\ It's review time!

The last OWN product that I received courtesy of iFabbo, is their Refining Moisture Night Cream.

With the way the weather has been, it has been driving my skin bonkers. Normally when summer is lurking around the corner, my skin (especially the t-zone) becomes more oily. But seeing as we've had a few cold nights (seriously?), I'm trying to get my skin to cooperate with the wonky weather.

So quick run down.
  • Combination skin. 
  • Oily T-zone (oil slick during the warm weather).
  • Dry around the sides of the nose, across the cheeks and on the chin.

So a night cream sounds like it could be my worst enemy, but is it really?

Onward and upward to the review!

27 May 2013

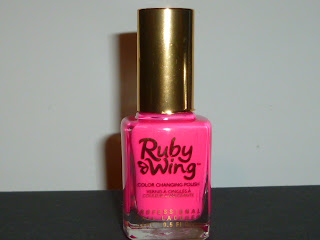
Swatch-view: Ruby Wing Color Changing Polish in Groupie


Yes! Another swatch-view post! I had found out that Five & Below (a store that sells various items starting at $1 going up to $5) had Ruby Wing Summer Collection. I missed out on it the first go around, then they moved the display out of view. Took me a little bit to find it, but I did! I had only picked up one at the time, then went back to pick up the rest of the collection and they were SOLD OUT! In three days! They had a full display too! (Darn it!)

Anyway, I think it's pretty obvious which one I picked up, of course when I put it on, we had oh so lovely days of nothing, but rain.

Ruby Wing Color Changing Polish
If you love the beach even though your life doesn't always feel like a day at one, and celebrate life and everything it has to offer – there's now a nail polish that celebrates you.   Ruby Wing is every free-spirit's dream: color changing nail polish that transforms in sunlight.   Our color changing technology lets you switch your style from day to night, indoors to outdoors.   Each one of our shades dramatically change in direct sunlight and then back again once inside.
 via Ruby Wing website

Ruby Wing Color Changing Polish

Packaging: If you're familiar with Ruby Wing or even their sister brand, Color Club, then you're familiar with the square shape bottle that all their polishes come in. The cap itself is a gold cap. Actually it's a cap over a cap, one of the polishes I purchase, the gold cap twisted clean off (oops!) revealing the black underlying cap under it. The brush is a standard nail polish brush.

Ruby Wing Color Changing Polish

Color: The one I picked up is named Groupie. It is a neon hot pink (love!), and it is a gorgeous pink. Once it hits the sunlight it looses it's neon pinkiness (think that's a new word) and it turns into a deeper pink. Almost a light pink-wine color.

Formula: Slightly on the runny side. I had a couple of issues with it, streaking and balding near the cuticles. Once you get through the second coat though it goes smoother. Although in the sunlight you can see the streaking (yikes!). I used three coats to get it completely opaque.

Ruby Wing Color Changing Polish
Inside, flash, natural setting
Ruby Wing Color Changing Polish
Outside, no flash, natural setting
Overall Verdict: LOVE this polish! While there are minor issues with the formula, I'm sure the polish can be worked with. What I REALLY loved about this is that, it's the first neon polish that I have that didn't dry matte. It dries glossy. This polish is the reason why I want to get the rest of the collection.

Price: $10.00

Availability: Ruby Wing Website, or if you have a 5 & Below near you, check out there!


25 May 2013

Swatch-view: Rimmel London Cocktail Colour in a Flash


Quick post!

Wondering around Walgreens last night, I happened upon a mini-display of Rimmel London's Cocktail Colour In A Flash Nail Polish. From my understanding there IS a larger display that has various items that lovers of Rimmel have been WAITING ages for here in the states.

There are five colors total in the Cocktail Colour collection (on the display it said, exclusive to Walgreens), so after much going back and forth on what color to actually try first.


Rimmel London Cocktail Colour in a Flash
#120 Shirley Temple
Rimmel London Cocktail Colour in a Flash Nail Polish. Colour in a Flash! Intense fully pigmented nail colour, charged with high energy colour pearls.
Rimmel London Cocktail Colour in a Flash

Packaging: For a nail polish, the bottle comes across to be on the small size. In my opinion at least. Then again I'm used to bottles the size of OPI. You get a total of 0.27 fl. oz./8 ml of product. The cap is standard black cap with a hologram sticker of, well, a cocktail on it.

Rimmel London Cocktail Colour in a Flash

The brush is a wide brush, it isn't a blunt end though. It actually curves on the sides. I actually prefer the wide professional brushes that have curves along the sides because, for me, it fits my cuticles better then when a wide brush has a blunt edge to it.

Rimmel London Cocktail Colour in a Flash

Color: I ended up purchasing Shirley Temple (#120), which is an orange polish with a gold shimmer overlay.

Rimmel London Cocktail Colour in a Flash

Formula: Here's the tricky part. The polish itself is sheer, and on the back of the bottle it says, One-coat nail polishes. Perhaps if you don't mind a sheer coat of color and shimmer, one coat is all you'll need and you'll be out the door. But for someone who likes their polishes to be opaque, one coat isn't going to do it! I also noticed that it can be a bit of a fussy polish. Balding in some areas, but definitely no issues with streaking. Also on the bottle, it says that the polish dries in 60 seconds. True. The first coat was dry enough to the touch in about a minute. I ended up doing 4 coats to get it fully opaque or the appearance of it being opaque to me.

Rimmel London Cocktail Colour in a Flash
Natural setting on my camera.
Rimmel London Cocktail Colour in a Flash
Vivid setting on my camera.
Overall Verdict: I definitely do like the polish. It's such a vivid, lively color. Perfect for summer! I do wish the formula wasn't on the sheer side though, having to put so many coats on, even with a polish that says it dries in 60 seconds, multiple coats can hinder the polishes drying time. Besides that, I really want to go back and grab the other four colors.

Price: $2.49

Availability: As far as I know, this is exclusive to Walgreens. I'm sure though, it'll make its way to other locations that carry Rimmel.

23 May 2013

Review: Revlon Lash Potion Mascara


For a long period of time, Revlon was hosting a Cast A Spell sweepstakes, not only would you be joining in in helping them reveal their latest spellbinding product, but you would be entering to win a trip to the MTV Movie Awards where said product would be revealed.

During the MTV Movie Awards, the product was revealed to be the newest mascara Lash Potion by Grow Luscious.

Luck would have it, I ended up receiving a sample of the product. After giving it a good long try out, review time!

21 May 2013

Weekly Manicure: Tangerine Mayhem

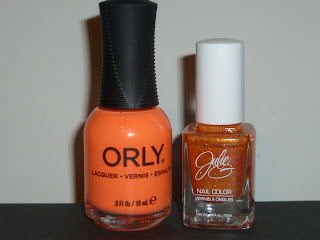
It's manicure time! On Friday, I had discovered that Harmon's had the new Orly collection. Like always the brightest color caught my eye, Mayhem Mentality. Once I got home, I quickly removed the polish I had been wearing and applied Mayhem Mentality

Of course, my Love/Hate relationship with Orly continues. I love, love, love the colors; but the formula itself, hates me. Didn't even have the polish on a full day and the chipping began. By Monday I had a total of six chips occur, four repairs had already been done. Sigh. This happens all the time with Orly polishes with me. 

This manicure came about after I receive quite a few... unnecessary insults from someone at work over the color of the polish. Seriously, I could go on a very lengthy rant over it, but I'm refraining from doing so.

So, onto the MANICURE!

Due to my chipping issue that I was experience, but wanting to keep using Mayhem Mentality. I ended up pairing it with JulieG Frosted Gumdrops in Tangerine Dream

Mayhem Mentality is such a gorgeous neon orange (I almost want to say it's like a neon coral) that it drives my camera CRAZY. Rather fitting huh?

  1. Base coat first.
  2. I painted both the ring fingers and thumbs with Tangerine Dream. 
  3. Then taped over the tips, creating a v-shape. 
  4. Painted Mayhem Mentality on first (two coats). Removed the tape while the polish was still wet.
  5. Being Mayhem Mentality dries down to a semi-matte finish, I applied a quick dry top coat on while avoiding the area of the nail that was still bare (besides the base coat).
  6. Then following along the edge of Mayhem Mentality, I painted Tangerine Dream onto the tips. Two coats of that.
  7. Clean up with an angle brush and polish remover.
  8. Done!

Taken using a Natural setting on my camera to capture Mayhem Mentality

Taken with my regular camera setting.

If anyone would like to see a tutorial for this, please let me know! :D

20 May 2013

Review: Milani Eyeshadow Primer


Ok, so I got rather distracted because I'm watching The Hobbit ;x Seriously, I've had it since Easter and haven't had a chance to actually watch it. Suppose it was a good thing my cable went out then!

Anyway, enough of that, review time! Finally posting my review of Milani's Eyeshadow Primer.

So, onward and upward to the review!

19 May 2013

Eyes of the Day: Naked 2 Venus

I'm back with my eyes of the day or eye of the day, whichever works better! 

I can happily say that I have in my possession the Urban Decay Naked Basics palette now! Huge, huge thanks goes to nuclear_beauty on instagram who held the giveaway!

Going to work on Saturday, I knew that I wanted to do a nice smokey eye, but a neutral smokey eye. Normally I go for the metallics, shimmers and glitters type of smokey eyes, but due to the fact that Saturday was going to be rather crazy at work, I wanted to tone it down. 

I apologize in advance for not doing a pictorial for this look, I was in a rush having to be at work by 4:30pm :x

Products Used
  • Milani Eyeshadow Primer
  • Urban Decay Naked Basics
  • Urban Decay 24/7 Glide-On Eye Pencil in Rockstar
  • Studio Gear Impactfull Pro T.L.S. Mascara

Step 1. I primed the lids using Milani's Eyeshadow Primer (review on this tomorrow!). Waited 30 seconds for the primer to set.

Step 2. After the primer set, I tight lined (using the Q-Tip method) my upper lash line with Urban Decay 24/7 Eye Pencil in Rockstar. Normally I just shut the eye and smudge, but I've come to notice that this is the cause of the flaking I've been experiencing. And here I was blaming my mascaras!

Step 3. I then took Venus from the palette and used that as my inner corner highlight.

Step 4. Then taking Faint all over the lid leaving a small space between Faint and Venus because I wanted a blending color between the two. I also took Faint above the crease slightly.

Step 5. The blending color between Venus and Faint, I used Naked 2. It comes across as a light color but is easily buildable, perfect bridge between the two.

Step 6. Getting that smokiness. Using Crave, I slowly blended it into Faint going towards the center of the lid, trying to get it as close to the lash line as possible, and then taking it into the crease.

Step 7. For the brow bone and to blend the remaining Faint above the crease, I used Walk of Shame.

Step 8. Lined the lower lash line to mimic my lid, then used Rockstar on the lower water line.

Step 9. Curl the lashes!

Step 10. Added two coats of Studio Gear Impactfull Pro T.L.S. Mascara.

End result?

Of course I can't get away without my mascara TRYING to act like eye liner. Sigh. This happens when I'm in a hurry ;x


17 May 2013

For The Love Of: Hair Care

Not exactly a cleaver title, but it works for me! Yup, you guessed it, this is basically what I do to try and take care of my hair.

Quick history of my hair, I originally had pin straight hair that went down to my waist. Wouldn't take a curl or anything. Super thick, coarse and luscious. Then I went for a drastic change, I got my hair cut up to my chin. Boy did I regret it. It was a blunt cut and just looked terrible on my round face.

My hair has been frosted, highlighted and dyed, since I was 13. Majority of all this, my Mother did, as well as my Grandfather. He actually enjoyed the frosting because of the OH SO LOVELY frosting cap that you'd hook the hair through. That thing was the DEVIL!

My hair has been, blonde, red, bleached, black, purple, turquoise, blue, red with pink streaks, black with various under layers of multiple colors. I've also had the infamous platinum skunk streak in the front a la Rogue.

What it comes down to is, my hair is damaged. The worst of the bleaching was when my hair had been dyed black, and the dye actually stained the hair. My Mom actually did two processes of bleach to get the black dye out of my hair. I don't know what she did, but my hair was never burned or brittle from the processes.

So, enough of my blabbling! Curious about the products I use to help my damage hair? Here we go! And as a quick note, I don't use "high-end" products. I've tried many, and they just don't mesh well with my hair.

Shampoo

Courtesy of Google, edited for Beauty Parfait
Yeah, I use three different shampoos. Not at the same time though! Haha. I alternate between two Volume shampoos then have a "cleaning" shampoo to get all the build up out of my hair.

Suave Volumizing Shampoo, Aloe + Ginseng
This volumizing shampoo is infused with 100% natural aloe vera & ginseng, which are known for their rejuvenating properties.  It cleanses without heaviness for hair that's full of body.
Pantene Pro-V Fine Hair Solutions Volume Shampoo
System for 24 hour full, thick body.  Gently cleans with zero heavy build up.  Preps fine hair for an amplified look inspired by collagen.  Provides manageability so you can create your full bodied style.  With Pro-Vitamins + Collagen pumping effect. 100% Weightless body for fine hair.
 Herbal Essences Drama Clean Refreshing Hair Shampoo
Come clean with Drama Clean normal hair shampoo, fused with a combination of citrus blossom and green tea for hair that is renewed, refreshed and ready to go.  Get light, lush locks with all the lather, but none of the gunk.  This little soap opera isn't over yet!  After lathering up with this normal hair shampoo, try the equally fresh-headed conditioner.

Conditioner
Courtesy of Google
 For conditioners I only use one, for now. I just purchased a different brand of conditioner that I found at Harmon's for... $.92 :O!

Suave Professionals Keratin Infusion Smoothing Conditioner
Natural keratin protein in hair depletes over time leaving it unmanageable, frizzy,  and harder to style.
This deep nourishing conditioner, formulated with Keralock Technology, infuses keratin and seals the hair cuticle from the outside. Leaves hair soft, smooth and shiny.

Treatments/Serums

Courtesy of Google, edited for Beauty Parfait
 Right now I use two different treatments/serums. I alternate between the two.

Organix Repairing Awaphu Ginger Dry Styling Oil - Review

A light and dry styling treatment specially formulated with deeply moisturizing oil extracted from the Hawaiian awapuhi ginger plant, plus hydrolyzed keratin proteins to strengthen the hair from within leaving it bouncy, super soft and shiny!
 Suave Professionals Keratin Infusion Heat Defense Leave-In Conditioner
Natural keratin protein in hair depletes over time leaving it unmanageable, frizzy,  and harder to style.
This dual-action lightweight formula, enriched with Keralock™  Technology, both infuses keratin inside the hair fiber for ultimate moisturization and helps protect hair while heat styling.
 If anyone has any suggests to products I should try, I'm open! 
Also, if anyone would like to see any reviews from anything mentioned above, please leave a comment!

16 May 2013

Swatch-View: Sally Hansen Sugar Coat


With texture polishes all the rage now. If you follow me on instagram, I discovered that Target got a bunch of new collections in! YES! Two the collections were from Sally Hansen. The Sugar Coat collection and the Fuzzy Coat collection.

Excited that my Target FINALLY got them in, I got one polish from each. Right now this post is about the Sugar Coat polish. The Fuzzy one will be later on as I have an idea for a design, but I don't have the other color to go with it =\

15 May 2013

Review: Relogy Natural Acne Treatment


Next item up for auction- no no no.

The next product that I wanted to review from iFabbo was Relogy Natural Acne Treatment. I actually browsed around before making the choice though because not only am I all for trying an acne treatment, but I'm also iffy on trying one.

So, when I received this in the mail, I was actually going through a rough bout of blemishes. Perfect time to give this ago right?

Onward to the review and if the products worked for me.

14 May 2013

Swatch-fest: Butter London Heavy Medal Collection


Oooh, my goodness! I actually couldn't wait to do this post. I was, insanely, lucky to have won a Butter London Trio from a Youtube giveaway that Araceli_beauty89 hosted (sponsored through Girl's Best Friend & Co).

While I know that the Olympic Heavy Medal Collection came out last year... I don't care, I have Butter London polishes nooooow! 

Butter London Olympic Heavy Medal Collection


My apologies for the outburst, I had some Cotton Candy ice cream earlier (it had pop rocks in it o.O), so I'm a little hyped.

Butter London Olympic Heavy Medal Collection

I did some quick swatches of the colors from the trio even though I'm sure everyone had seen them before.

Butter London The Old Bill
The Old Bill
The Old Bill. The bronze of the trio, I'm starting off with this one first because I have a soft spot for coppers. Described on Butter London's site as a Burnished copper with a beautiful antique patina. It is exactly as described. I have several other coppers, and this one definitely comes across as antiqued which is lovely. This was the first polish I actually started out with, with the swatching, so it was the first introduction to Butter London's formula. I had no issues with it as it seem to go on smooth, not overly thick, but not overly thin either. Two coats and it was opaque.

Butter London Diamond Geezer
Diamond Geezer
Diamond Geezer. The Silver of the trio. Described on the website as a A proper platinum nail lacquer, silvery and shiny. I actually don't have a flat out silver in my collection. I have a platinum, but you can tell it isn't silver. So this is one I'm uber excited over. This one actually blew out my camera because of how brilliant it is. Which is why the angle it slightly further away than the other two. It was the only way for me to get a proper swatch photo. The formula on this one ran a little on the sheer side, so it took three coats for it to be opaque.

Butter London The Full Monty
The Full Monty
The Full Monty. The Gold! Described on the site as a Does what it says on the bottle. Full-on molten gold nail lacquer. This is the polish that I decided to wear, basically because it was the last one I was going to swatch, plus getting late :x But I love it. Definitely think this one is an antique gold, absolutely gorgeous. Two coats and it was opaque.

Can I just say that the caps are amazing? I tend to have difficulty sometimes when it comes to opening nail polish bottles, brand new. I don't know if it's because they're just sealed tightly or if people play with them too much in the stores. The simple fact that these bottles come with grooves in the brush cap, then a secondary cap that slips over, it just makes it much easier to get the bottle open if it's stuck. Of course, I don't know if that is what the purpose of the second cap is, I'm pretty sure it's to make the bottle look sleek in design.


12 May 2013

Tutorial: Iron Man Mark 25 Inspired Eye Make-up

It's that time again! Yup, I have another Iron Man inspired pictorial. I had this one planned ever since I saw the movie, it was just the matter of trying to figure out what Mark it was. I'm still not entirely certain, but I went with the Mark 25.

Courtesy of Google
If you look at the official Iron Man 3 game, the Mark 25 is mainly a dark charcoal/blue hued suit that has a vivid green arc reactor installed, not your typical arc reactor as it appears as a thin-ish slit in the chest plate. The eyes and accents on the helmet though also glow the same vivid green. Not to mention there's also yellow/gold to the armor as well. I originally thought the suit I saw in the movie (briefly), that it was a different suit, couldn't find any images of what I thought I saw, so the yellow/gold comes at the very end of the tutorial.

Started off with two bases. I wanted to make sure that green popped and the charcoal was dark enough. I put Pixi's Shell Sheen along the lash line of my lid, along the inner corner and half way along my lower lash line on the bottom. Then taking Pixi's Brun Beam Everywhere else up to the crease and the other half of the lower lash line. I tried to blend in, but both had already dried. Erk!

Next up, the green! After going through all my greens and not really finding that "neon green" color, I ended up finding this one from Wet n Wild from the I Dream of Greenie trio shadow set. It's the Eye Lid color. Super duper soft shadow that breaks all over the place when I close the lid. Anyway! I placed it all over the area where I placed shell Sheen, leaving the very inner corner bare. Also took it along Shell Sheen on the lower lash line. I went over this a few times to get it really vivid.

The charcoal next! I used e.l.f. Baked Eyeshadow in Dusk, placing it where Brun Beam is. Also taking it along Brum Beam on the lower lash line, meeting it with the Green from above. I then went over the green again.

For the inner corner, I didn't use the blue shift from Aura as I normally would, being the arc reactor is green, I stuck to the I Dream of Greenie trio, and used the light green labeled Brow Bone. Blending it a little bit into Dusk.

Taking South from Urban Decay's Glinda palette, I blended that into the crease and above. To blend out South, I used Illusion (not pictured) from the same palette.

Two black liners like from the last pictorial. I tight lined my upper lash line using Studio Gear Invicible Gel Liner in Invincible Onyx, then to line my lower water line, I used Rimmel London's Blackmail.

After that for Mascara I used e.l.f. Volume Plumping Mascara on the upper and lower lashes. 

A minor tweek that I did was add in a yellow to the inner corner, for this I used the Brow Bone from Wet n Wild's Bright Idea trio. End Result?


Products Used
  • PIXI Lid Last Shadow Pen in Shell Sheen
  • PIXI Lid Last Shadow Pen in Brun Beam
  • I Dream of Greenie from Wet n Wild
  • Baked Eyeshadow in Dusk from e.l.f.
  • South from Urban Decay Glinda Palette
  • Bright Idea from Wet n Wild 
  • Illusion from Urban Decay Glinda Palette
  • Studio Gear Invincible Gel/Cream Eye Liner in Invincible Onyx
  • Rimmel London Scandaleyes Shadow Stick in Blackmail
  • e.l.f. Volume Plumping Mascara
Related Posts Plugin for WordPress, Blogger...