Showing posts with label brands: studio gear. Show all posts

30 December 2013

Review: Studio Gear Cosmetics Holiday Smokey Eye Palette


Fear not, I am still around! With the holidays and all, it's been a little bonkers for me.

Enough intro, onward to the review!

Up on the review block is Studio Gear Cosmetics Holiday Smokey Eye Palette.

Be radiant on any occasion with this sultry, shimmery palette of dramatic shades – perfect for creating a classic smoky eye look, with a hint of unexpected golden glimmer. This collection of four complimentary eye shadows with matching blush deliver several day to night options that are both seductive and wearable. With pure color, pigment-rich formulations, you’ll be sure to smolder all night!
via Studio Gear Website

Studio Gear Cosmetics Holiday Smokey Eye PaletteStudio Gear Cosmetics Holiday Smokey Eye Palette

Packaging: The palette itself comes in a slip cover that slides off. It's a brilliant and eye catching array of yellows and purples. The palette itself is a chic black and grey color scheme, which I think works well with the slip cover. Inside the palette you find the SG insignia design covering the palette. On the underside of the cover, is a step by step guide (not pictured), opposite that is the actual palette, four eyeshadows and one blush.


Studio Gear Cosmetics Holiday Smokey Eye Palette
Frost
Position: Top Left

This is the lightest shade of the four eyeshadows. A frosty, shimmery white. Perfect for the inner color highlight and below the brow.

Thoughts: Not terribly pigmented, I had to work with this one a bit, it's definitely the sheerest of the four.

Studio Gear Cosmetics Holiday Smokey Eye Palette
Platinum
Position: Bottom Left

Second darkest shade. This one is basically a silver with grey mixed. I actually like to use this all over the eye, sometimes alone or smoking it out.

Thoughts: I'm not normally one for silver toned eye shadows, but I do like this one. The pigmentation on it is better than Frost, easy to work with.

Studio Gear Cosmetics Holiday Smokey Eye Palette
Glimmer
Position: Bottom Right

Hard to describe. It isn't quite gold, but it isn't really bronze either. I'd actually like to say it falls between the two. A happy medium, which to me makes this color unique to the palette. 

Thoughts: Definitely the oddity of the four colors, but I like it. It adds to the smokiness, whether you follow the guide and use this as the blending color, or use it as the base color, or even alone.

Studio Gear Cosmetics Holiday Smokey Eye Palette
Coal
Position: Top Right

A charcoal grey, not a true black, with hints of silver added in.

Thoughts: While a matte black, I think would have worked perfectly for a palette of shimmers, this works as well. It isn't terribly harsh, which a matte black can be, it's soft, but makes the point of the smokey eye.

Studio Gear Cosmetics Holiday Smokey Eye Palette
Snowy Glow - Blush
Position: Center

A soft coral-rose pink blusher with the slightest shimmer. 

Thoughts: I love this blush, at first I was iffy, but this is a blush that is buildable. It's sheer, but you can get a lovely flush for your cheeks as you would during the cold months. 

Studio Gear Cosmetics Holiday Smokey Eye Palette
(L-R) Frost, Glimmer, Platinum, Coal, Snowy Glow


Studio Gear Cosmetics Holiday Smokey Eye Palette


Overall Verdict: I definitely do like this palette, although it has its faults (this is my own personal preference at that), namely the sheerness of Frost. Other than that, it's wonderful. The smokey look that you can get from this varies to the degree of darkness you want at the corner, but I do think this is a palette that you can go from a day look to a night look with no issue. On top of that, Snowy Glow is the perfect compliment to the four shadows. It ties everything together.

Price: $40; receive 10% off your purchase using the coupon code SGHOLIDAY

Availability: Studio Gear Cosmetics and select ulta.com stores


The product featured in this post had been sent to me by Studio Gear Cosmetics via the Brand Backer campaign. What appears in this post is my 100% honest opinion on the product, and it is in no way influenced.

05 November 2013

This Just In: Studio Gear Cosmetics November Kit


Studio Gear has released their November Kit called Bye Bye Blemishes!

Say bye bye to blemishes and hello to beautiful! Our Bye Bye Blemishes Kit features Flashlight Instant Brightener and the Inline/Outline Pro-Lining Pencil for covering dark spots, acne, and more, and CC Cream and Vitamin E Lip Balm for treating and correcting problem spots.

The November Kit Includes:
  • CC Cream Sample
  • Flashlight Instant Brightener
  • Inline/Outline Pro-Lining Pencil
  • Vitamin E Lip Balm
Valued at $75; the Bye Bye Blemishes Kit is available through the Studio Gear website, priced at $30. To get 10% off your purchase use promo code PARFAIT13 at the check out!

07 June 2013

Favorites: May 2013


It's that time again! After a rather hellish day at work (do not get me started, trying to do the om thing and calm myself still), I mentioned previously that I skipped April Favorite because I only had two, and I didn't feel as if that was enough to do an April Favorites.

This time, I actually have more <cue cackling>, plus a non-beauty favorite :O! What could it be?!


Urban Decay Glinda Eyeshadow Palette
Graceful, fearless and bewitchingly beautiful, Glinda is the kind of witch we aspire to be. Inspired by the "good witch" from the upcoming movie OZ: The Great and Powerful, this palette includes shadow colors, eye pencil color and lip color - in short everything you need to create Glinda's spellbinding look, along with countless other looks.
This is THE palette that I have been primarily using through the month of April and May. I've also used it quite a few times in pictorials. I didn't a review on it because I figured everyone has seen it, and probably is tired of the views. But if anyone would like to see a review on here for it, please let me know! I'd be more than happy to do so. 

Urban Decay 24/7 Glide-On Eye Pencil in Rockstar
This waterproof eye pencil delivers smooth, creamy, long-lasting color that glides onto skin without skipping or tugging.
Rockstar came with the Glinda palette, and I have to say I love using this eye liner for smudging and lining my water line more so than black eyeliner. Because it's a eggplant color (deep wine/purple) it tends to make my green eyes pop more than with regular black eyeliner.

Urban Decay Super Saturated High Gloss Lip Color in Glinda
Rich and creamy lipstick with insane amounts of high-gloss shine—all captured in one chubby pencil.
As the color suggests, this was the High Gloss that came with the Glinda Palette, and it is/was exclusive to it as well. Because it's such a neutral color, I love wearing it when I have a smokey eye going on.

Wet n Wild Coverall Cream Foundation in Fair [review]
Glides on weightlessly for sheer-to-medium coverage that’s never heavy, chalky, or dull. Evens out flaws with a silky, semi-matte finish that let’s your skin’s natural luminescence shine through. Contains SPF 15 for the ultimate in anti-aging treatment.
Yes, this is the only foundation that I have been using during the month of May! Actually the one in the photo is nearly finished as well, I ended up getting a back-up once I'm done.

NYX Butter Gloss in Cherry Pie [review]
Add a little more sweetness to your lips with a touch of the Butter Lip Gloss available in 12 scrumptious colors! Get creamy sheer to medium coverage on your lips without that sticky sensation. It’s perfect for every sweet tooth!
Yes, this was in a favorites before and I still love it! For me it's the perfect red that actually works well with my skintone without being over the top.

Physicians Formula Sexy Booster Sexy Glow Blush in Rose [review]
Irresistibly Sexy Blushing Glow: Wear this perfect blend of shimmery blushing tones like lingerie for your face for an instant sexy boost with an alluring blushing glow.
Sexy Boosting Formula: infused with the scent of warm vanilla, "afterglow" illumination and pheromone-mimicking ingredients including clinically tested Androstadienone, Cocoa Extract (aka "the Love Chemical") and ancient aphrodisiac Horny Goatweed to enhance your sexy side.
Besides using a tint a tiny handful of times, this is mainly the only blush I have been using during the month of May, which is odd because I do have other blushes! But I absolutely love this one, not to mention the scent!

Studio Gear Cosmetics Impactfull Pro T.L.S. Mascara [review]
Studio tested, high impact Pro T.L.S. Mascara by Studio Gear THICKENS, LENGTHENS and SEPARATES the lashes, delivering maximum fullness and flare.
I definitely LOVE this mascara. I'm actually not sure, but I think I'm nearly running on E :( I've been using it sparingly since, but I'm honestly gearing up to just purchasing the full size. Although I am leery of that for reasons.


Orly Nail Lacquer in Mayhem Mentality
Take risks. Rock opposites. Start a riot with envy-inciting style. Now is the time to blur the line between energetic and outrageous - with Mash Up, the Summer 2013 collection from ORLY.
Although the formula for Orly polishes do not like my nails (instant chipping), I absolutely ADORE this color. It's like a neon-tangerine color. This was actually my polish to transition from springy colors to hot weather colors. Which certain, nameless folk at work do not like.


Non-Beauty Favorite... Drum Roll

Courtesy of Google
The Hobbit!

Yes, even though I started watching it late May, I have been kicking myself for not watching it sooner. I adored the Lord of the Rings movies, books as well as The Hobbit, but I didn't see the film adaption in the theater when it was released. Definitely something odd for me being I saw Fellowship of the Ring 15 times in theater (I'm quite serious, I have the stubs to prove it! I even dressed up as an elf for The Two Towers :O). And right now, like many of the fans, I'm eagerly awaiting the trailer for Desolation of Smaug! AH! Such a long wait!

Have any May Favorites of your own?
Definitely feel free to share, if you have a blog or even a YouTube, feel free to link to the post/video in the comments, I'll check them out!


19 May 2013

Eyes of the Day: Naked 2 Venus

I'm back with my eyes of the day or eye of the day, whichever works better! 

I can happily say that I have in my possession the Urban Decay Naked Basics palette now! Huge, huge thanks goes to nuclear_beauty on instagram who held the giveaway!

Going to work on Saturday, I knew that I wanted to do a nice smokey eye, but a neutral smokey eye. Normally I go for the metallics, shimmers and glitters type of smokey eyes, but due to the fact that Saturday was going to be rather crazy at work, I wanted to tone it down. 

I apologize in advance for not doing a pictorial for this look, I was in a rush having to be at work by 4:30pm :x

Products Used
  • Milani Eyeshadow Primer
  • Urban Decay Naked Basics
  • Urban Decay 24/7 Glide-On Eye Pencil in Rockstar
  • Studio Gear Impactfull Pro T.L.S. Mascara

Step 1. I primed the lids using Milani's Eyeshadow Primer (review on this tomorrow!). Waited 30 seconds for the primer to set.

Step 2. After the primer set, I tight lined (using the Q-Tip method) my upper lash line with Urban Decay 24/7 Eye Pencil in Rockstar. Normally I just shut the eye and smudge, but I've come to notice that this is the cause of the flaking I've been experiencing. And here I was blaming my mascaras!

Step 3. I then took Venus from the palette and used that as my inner corner highlight.

Step 4. Then taking Faint all over the lid leaving a small space between Faint and Venus because I wanted a blending color between the two. I also took Faint above the crease slightly.

Step 5. The blending color between Venus and Faint, I used Naked 2. It comes across as a light color but is easily buildable, perfect bridge between the two.

Step 6. Getting that smokiness. Using Crave, I slowly blended it into Faint going towards the center of the lid, trying to get it as close to the lash line as possible, and then taking it into the crease.

Step 7. For the brow bone and to blend the remaining Faint above the crease, I used Walk of Shame.

Step 8. Lined the lower lash line to mimic my lid, then used Rockstar on the lower water line.

Step 9. Curl the lashes!

Step 10. Added two coats of Studio Gear Impactfull Pro T.L.S. Mascara.

End result?

Of course I can't get away without my mascara TRYING to act like eye liner. Sigh. This happens when I'm in a hurry ;x


04 May 2013

Red and Gold: Iron Man 3

Yes! I got back from seeing Iron Man 3, no worries won't go into a review or anything. My Iron Man Inspired series will continue as I saw an Armor in the movie (not sure of the Mark) that I want to try and do a tutorial for.

I wanted to do a quick post of what look I ended up going with for today, before I have to head off to work.

Nails
This is actually the simple form of what I wanted to do. The polish did NOT want to dry. I even did the running the nails under ice cold water to try and speed up the process so I could put the guides on for the half moons. Didn't work. Used a guide on my pinky and ring finger the gold polish started to pull up. So 8 out of 10 fingers had the half moons done by hand. These are actually the two polishes that I used for the other two Iron Man movies as well. They represent the armor well!

Polishes Used
  • Sally Hansen Hi-Definition Hail Color in Lite
  • Color Club in Warming Trend

Modified the Suitcase Armor look that I did here, just switched out the silver for gold and added in the blue shift of Aura from Urban Decay.

Products Used
  • PIXI Lid Last Shadow Pen in Peach Pavé
  • Rust from NYX
  • Crown & Sceptre from MAC (LE)
  • Family Treasures from MAC (LE)
  • Aura from Urban Decay Glinda Palette
  • OZ from Urban Decay Glinda Palette
  • South from Urban Decay Glinda Palette
  • Illusion from Urban Decay Glinda Palette
  • Studio Gear Invincible Gel/Cream Eye Liner in Invincible Onyx
  • Rimmel London Scandaleyes Shadow Stick in Blackmail 
  • Studio Gear Impactfull Pro T.L.S. Mascara

01 May 2013

Tutorial: Iron Man Suitcase Armor Inspired Eye Make-up

I'm baaack! I'm still trying to figure out what to do with the other armors, but for now I'm doing a tutorial using the Mark V or the Suitcase Armor as inspiration.


If you've seen Iron Man 2 then you'll be familiar with the Suitcase Armor that Tony dons while under attack by Ivan Vanko. It's primary color is the metallic red (candy apple red as mentioned in the first movie) and silver/chrome. I did throw in a third color, mainly representing when the armor is heavily damaged by Vanko.

So lets get on with the tutorial!

Started off by using PIXI Peach Pavé as the base for the shadows.

Taking a pencil brush and using NYX Rust as one half of the "Candy Apple Red", I went along the crease, basically doing a blended cut cease if that makes sense. Not pictured is that I took it slightly along the lash line. I also took Rust along one half of the lower lash line.

Next the other half of the "Candy Apple Red", I used MAC Crown & Sceptre. Rust has a pinky tone to it so I wanted to cover that up by using a more muted metallic red. Which I think Crown & Sceptre does the trick. I just went over where I put Rust.

For the Silver/Chrome part, again, I used two different shadows. Starting off with MAC Melt My Heart as the base silver. I just filled in and blended the edges of both reds together with Melt My Heart. Taking this down along the lower lash line as well, filling in the other half.

The second silver I used which gives off more of a, chrome-esque, appearance is the silver side of OZ from Urban Decay. I just went over Melt My Heart, but with Oz I patted it on more so then blending. After putting that in place, I went over Crown & Sceptre again making sure that it stood out against the silver.

The Suitcase Armor gets heavily damaged by Vanko, and I wanted to somehow put a color in to represent the damage. Probably not the greatest representation of it, but I used South from Urban Decay above the crease. Again, I went over Crown & Sceptre.

For some reason my camera likes to blow this one out. But for the brow bone and to blend out the harsh line I created with South, I used Illusion from Urban Decay and a Missha fluffy brush. I think it's the blending brush.

Two part eyeliner. I used Studio Gear Invicible Onyx Gel/Cream Liner for tight lining. Then used Blackmail from Rimmel London on my lower water line. Optional, add wing liner! I'm still trying to get the hang of that, which is why I haven't done it.

After that (not pictured) I used the new mascara from Revlon, Lash Potion. Two coats to the upper lashes and a coat to the lower lashes. I probably should have curled my lashes, but I didn't want to run downstairs and try to dig out my curler ;x


Products Used
  • PIXI Lid Last Shadow Pen in Peach Pavé
  • Rust from NYX
  • Crown & Sceptre from MAC (LE)
  • Melt My Heart from MAC (LE)
  • OZ from Urban Decay Glinda Palette
  • South from Urban Decay Glinda Palette
  • Illusion from Urban Decay Glinda Palette
  • Studio Gear Invincible Gel/Cream Eye Liner in Invincible Onyx
  • Rimmel London Scandaleyes Shadow Stick in Blackmail
  • Revlon Lash Potion Mascara

25 April 2013

Review: Studio Gear Invincible Gel/Cream Eye Liner


The last item I received from Studio Gear is their Invincible Gel/Cream Eye Liner. I actually wanted to review this one last of the three because I wanted enough time to give it a real good go. 

Studio Gear Invincible Gel/Cream Eye Liner
My history with gel and/or cream eye liner is such, just smudging it into my upper water line. I've never attempted anything fancy. Once in a blue moon I would do a very thin line along the lashes, but that would be about it. Why is this? I have nerve damage in my right hand and tend to shake a lot, it progressively gets worse when I'm either stressed or trying to concentrate too long. I have come to the conclusion so long as I'm not trying to do an all out straight line, but dab it on, then I'm good. The other reason... my depth perception can be rather off. 

So, with that information, lets move on to the review!

24 April 2013

Review: Studio Gear Complete Color Luscious Lip Shine


If you took a gander at my review on the Impactfull T.L.S. Mascara from Studio Gear, then you know that I was sent two other items along with the mascara. 

One of the other items I was sent was Temptress from Studio Gear's Complete Color Luscious Lip Shine line. 

Studio Gear Complete Color Luscious Lip Shine

Now as a fair warning, swatches for lip products can go either way. I've been trying to get into a habit (why did I want to type Hobbit there) of doing lip swatches which would be the case for this post. However, my face had other plans, apparently my chin decided it wanted to host a party. The party guests didn't want to go into hiding. So when the party actually decides to leave, I'll then edit this post with a lip swatch. Those darn face parties.

Ok, enough of that, onwards and upwards to the review!

19 April 2013

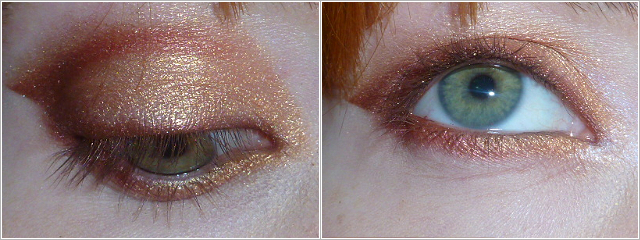
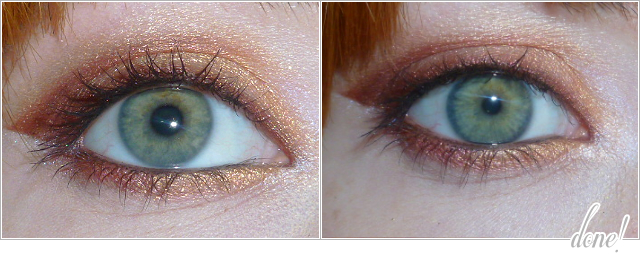
Tutorial: Iron Man Mark 42/47 Inspired Eye Make-up


Red and gold time! Took me a little bit to figure out which Mark this was because I hadn't seen it anywhere despite it being the main armor in Iron Man 3. So far I've seen it as Mark 42 (XLII) and Mark 47 (XLVII). Can be that Mark 47 is simply the latest model of Mark 42. Ok, who's confused now? Raise your hand! I'm just going to call it Mark 42/47 to avoid confusion. 

The primary color for this armor is the gold, with the metallic "hot rod" red becoming an accent color. That's what I tried to do with this inspired look. Hopefully, it came out well. I was rather please with it at least!

Mark XLII/XLVII
1. To start, I primed my eye first using Milani Eyeshadow Primer. Then placed scotch tape, under my lower lashes at the corner of my outer eye so that I could get a nice crisp line. I did take some of the tackiness away by sticking the tape to the back of my hand twice.

2. Urban Decay Twice Baked. I wanted the red that I was going to use to be dark enough, so I start off with a base shadow. Using Twice Baked, I creased the "wing" then blended it into the crease, outer V and then smudged it along the lash line going all the way to the inner corner.

3. NYX Rust. In years past for Iron Man, I've always used Rust as the "hot rod" red, although it really isn't as metallic-y as I would like, it works fine though. I packed this on over Twice Baked, making sure all the brown was covered up.


4. I then removed the tape, getting the nice crisp line that I wanted. Going to Rust again, I smudged that along the lower lash line.

5. For the next steps, I used two different golds. First using Urban Decay Half Baked. I started filling and blending in the bare area going from the outer corner inward.

6. I then went over Half Baked with the gold half of Urban Decay OZ; taking both Half Baked and OZ down along the inner portion of the lower lash line, connecting them both to Rust and blending.

7. Because both Gold colors kind of washed out Rust, I went over again, with Rust to get the red to stand out again. I combined Rust with NYX Pearl Mania in Penny which is similar to Rust, but more glittery. I also took Gold OZ up above the crease, blending it from the tip of the wing around to the inner corner. I then used Illusion from Urban Decay to blend OZ upward.

8. For the inner highlight, I took (again for the Iron Man series!) the white blue shift of Aura from Urban Decay. Not pictured here is that I also took Aura and ran it along the underside of the wing to highlight it.

9. Liner time! I first used Rimmel London Scandaleyes in Blackmail, smudged it into my upper waterline and along my lower waterline. After that I took a very flat, straight eyeliner brush, loaded it with Studio Gear Invincible Onyx eyeliner and gingerly ran it along my lash line.

10. Last, but not least. Mascara!!! I used Studio Gear Impactfull Pro T.L.S. mascara (review coming). Two coats to the upper lashes, then coated the lower lashes. Then, you're done!

Products Used
  • Milani Eyeshadow Primer
  • Urban Decay Twice Baked
  • Urban Decay Half Baked
  • NYX Rust
  • NYX Ultra Pearl Mania Penny
  • Urban Decay OZ
  • Urban Decay Aura
  • Urban Decay Illusion
  • Studio Gear Eyeliner in Invincible Onyx
  • Rimmel London Scandaleyes in Blackmail
  • Studio Gear Impactfull Pro T.L.S. Mascara


Related Posts Plugin for WordPress, Blogger...