Showing posts with label brands: maybelline. Show all posts

11 August 2013

Manicure: Sparks in the Crowd

Hello! I hope everyone had a wonderful weekend. Saturday night I posted a three part instagram photo which featured the manicure that this post is about. I have to say this method actually worked out better than any other method I've tried.

The three polishes that I used for the manicure. Ruby Wing Groupie and Crowd Surf, with Maybelline Lavender Sparks as an overlay. I actually found Lavender Sparks at Big Lots for a $1.00!

Step 1. Use a base coat. Any base coat will do. Let dry.

Step 2. Decide on your base color. Doing a gradient, I prefer keeping the base color light, but you can also do the opposite. Then paint your nails with the base color. I did two coats of Groupie, then allowed it to dry.

Step 3. Using some type of plastic, foil or anything that polish won't eat through, take the two colors you're going to use for the gradient (could be more than two of course). Generously paint them onto the surface, doesn't matter if they overlap, that actually helps out more in the end.

Step 4. Using a cosmetic sponge, tap the sponge over and over onto the wet polish, this'll blend the colors together. I should note, being my camera doesn't like Groupie and Crowd Surf together, Groupie is at the very top of the sponge, while Crowd Surf is below it.

Step 5. While the polish is still wet on the sponge, start tapping the sponge over the nail. The darker color should be closer to the tip, unless you want the gradient to go in the reverse. Which actually doesn't seem like a bad idea.

Step 6. Allow to dry and clean up, unless you use the tape method to keep the skin around the nail clean.

Step 7/8. Taking Lavender Sparks, I started at the free edge of the nail and dragged the glitter down towards the cuticle. This was tricky though because the polish is thicker than I'm used to. Some nails ended up with too much glitter! Once the glitter is dry, add your favorite top coat!

End results...


Don't forget to enter my Midnight Velvet Giveaway!

27 July 2013

Haul Ahoy!: Could a day be anymore Purrfect?


This is a small haul from yesterday (Friday), I normally prefer not to do posts about hauls, but I was definitely excited about this one! I just couldn't resist. So, this will be a quick post.

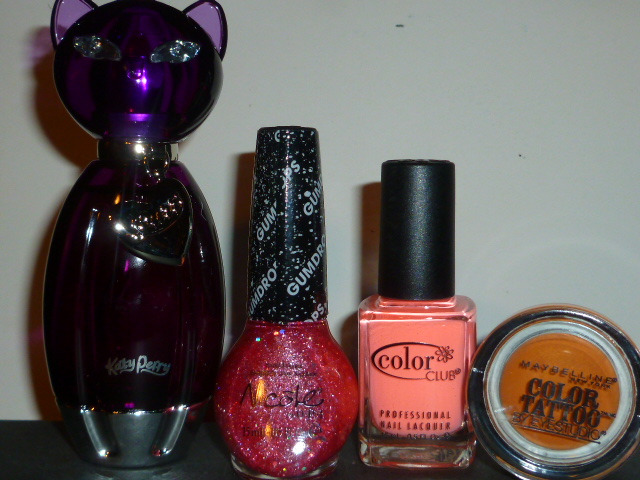
Two I purchased at Target, and the other two from Harmons.

Maybelline Color Tattoo 24hr Cream Gel Shadow in Fierce and Tangy ($2.97 - Target)
Color Club Girl About Town in East Austin ($4.29 - Harmons)
Nicole by OPI Gumdrops in Candy is Dandy ($6.94 - Harmons)
Katy Perry Purr Perfume ($8.84 - Target)

The Katy Perry perfume was a major find for me, it was at one of the Clearance end caps on a back aisle. So if you're looking for that perfume, in particular, definitely check out any of the end caps Target has.

15 June 2013

Quick Post: Eye of the Day June 15th


This is a quick post like graphic says. I got home late from work, hence why, quick post! :D Good news is, I think I finally figured out how to keep my curls in so that they don't fall. And holy moly, did they stay put! Last time I wore them, which was Thursday, they fell after, roughly, two hours. That's a different post all together though. For now, eyes of the day!

If anyone would like to see a pictorial for this, please let me know! I'll probably do it anyway :D
 

Products used
  • Milani Eyeshadow Primer
  • Venus from Urban Decay (Naked Basics)
  • Half Baked from Urban Decay
  • Rockstar (eyeshadow) from Urban Decay (Mariposa)
  • Crave from Urban Decay (Naked Basics)
  • Walk of Shame from Urban Decay (Naked Basics)
  • e.l.f. cream eyeliner in Black
  • Urban Decay 24/7 Glide-On Eye Pencil in Rockstar
  • Maybelline The Falsies Volum'Express Big Eyes Mascara (lower lashes)
  • Maybelline Volum'Express The Rocket (upper lashes)

09 June 2013

Pictorial: Club Naked II


I'm baaack with my pictorials! Haha! This is actually the look I've been wearing on Thursdays when I work the late shift at work. I've actually received quite a few compliments on it as well (there's a SHOCK!). So, instead of doing a step by step from just two photos, I quickly redid the look for a pictorial :D


First before anything, I primed my eyes with Milani Eyeshadow Primer and allowed that to set for 30 seconds.

Next, I used PIXI Shell Sheen in the inner corner, on the upper lid and below as well. Then taking Brun Beam I filled in the rest of the lid, also taking it along the lower lash line.

After that, I used MAC's Club (if you don't have this, I'm not sure, but check out Wet n Wild's Comfort Zone palette, there could be an alternative to use there) all over where I had placed Brun Beam. I took Club slightly into Shell Sheen just so that the inner corner color would have a good transition. I also brought Club up above the crease slightly for the next step...

Taking Naked 2 from Urban Decay's Naked Basics palette, I placed that above the crease as a transition color. I went in with a couple of swipes until I was satisfied with it.

Inner corner time! I used Venus again from the Urban Decay Naked Basics palette. Placing it anywhere that I had placed Shell Sheen, and blending it into Club.

Next, taking an angle brush I used e.l.f.'s Cream Eyeliner in Black to line my upper lash line. Then used Urban Decay 24/7 Glide-On Pencil in Rockstar on my lower water line.

Not pictured is the mascara I used, which is Maybelline's new The Falsies Big Eyes Duo Mascara (review to come!) I also forgot to curl my lashes (d'oh!). Two coats to the upper lashes and one coat to the lower lashes. Then you're done!


Products Used
  • Milani Eyeshadow Primer
  • PIXI Lid Last Shadow Pen in Shell Sheen
  • PIXI Lid Last Shadow Pen in Brun Beam
  • MAC Eyeshadow in Club
  • Naked 2 from Urban Decay Naked Basics
  • Venus from Urban Decay Naked Basics
  • e.l.f. Cream Eyeliner in Black
  • Urban Decay 24/7 Glide-On Pencil in Rockstar
  • Maybelline The Falsies Volum'Express Big Eyes Mascara


17 March 2013

St. Patrick's Day: Eyes of the Day

When Irish Eyes Are Smiling.

Happy St. Patrick's Day to everyone! 

In my house we celebrate our heritage around the clock, every single day. I'm very proud to be able to tell people that my Grandmother had been born and raised (until she was 6) in Co. Wicklow and that we still have family in Dublin.

Without further ado, onward to the eye of the day!

Products Used

Primer: PIXI Lid Last Shadow Pen in Shell Sheen

Inner Corner/Inner fourth: M.A.C. White Rabbit

Second Fourth: M.A.C. Sweet & Punch

Center Fourth: Maybelline Antique Jade

Outer Fourth/Outer V: Rimmel London Green Sapphire (not pictured, I couldn't find it after I used it)

Lower Lashline: NYX Loose Pearl Eyeshadow in Orange Zest Pearl

Eyeliner: Rimmel London Scandaleyes Shadow Stick in Blackmail 

Mascara: N.Y.C. Show Time Volumizing Mascara in Extreme Black 

Swatches
End Results
St. Patrick's Day Eye of the Day

I would love to see everyone's eyes of the day or even face of the day for St. Patrick's Day
Feel free to leave a comment below with a link!

16 March 2013

Tutorial: Baked Greens for St. Paddy's Day!

Well, this was originally going to be a simple St. Patrick's Day eye make up, but circumstances happen and I managed to turn this into a still photo tutorial. What circumstances you ask? Oh, just me and my little ol' accident prone self. I was removing nail polish and managed to spray myself in the face with polish remover, getting a tiny bit in my eye. Rinsed for 15 minutes (luckily we have eye rinse cups in the house). Of course that rinsing resulted in my eye make up looking like a hot mess. But because of this, I was able to redo the eye and do this tutorial.


Lets begin! Please note, if you'd like to do this look, you can use whatever brands and colors that you want!


1. I started off covering my entire eyelid with Pixi Shell Sheen, I also brought it down along my lower lash line to make the colors that I put there pop as well.

2. Using Urban Decay Half Baked, I took it to a third on the upper lid, around the inner corner, then brought it almost 2/3s along the lower lash line (a particular look I was going for, you'll see why later).

3. Taking Maybelline Antique Jade, I swept that across the middle 1/3 of the eye, blending it into Half Baked, then took it from the outer corner and half way to the center of the eye on the lower lash line.

4. The final third, the outer corner or outer V, I used the emerald shade of Rimmel London's Green Sapphire  Quad palette (it's the one that's on the left side). This color appears emerald, but it is more of a black with an emerald sheen to it, so it can be deceiving in the palette. Working this into the outer corner, then into the crease, I swept this into the crease until it was about to the middle of the eye. Then worked only a small bit of this color on the outer corner of the lower lash line.

5. Touched up Antique Jade. I then ran Half Baked under Antique Jade on the lower lash line.

6. I wanted Half Baked to stand out a bit more, so I loaded up the very edge of my brush, and took it from the inner corner and into the crease, so it'd meet that dark emerald shadow from Green Sapphire.

7. Again, I feel silly for saying this, but I absolutely love using Rimmel London's Scandaleyes Shadow Stick in Blackmail as eyeliner. Whoops! I simply lined the upper and lower waterlines.

8. Then added my HG Mascara, N.Y.C. Show Time Volumizing Mascara in Extreme Black. I think two coats? Yeah, two coats. And that's it, done!


I hope you guys enjoyed! This was actually far easier than I thought it'd be.


09 March 2013

EotD: Gaelic Green

I meant to get this up yesterday after work, but I was just too tired. Bad excuse, but the truth! This can also be considered the start of my St. Patrick's Day eye make-up as well.

Greens and gold this go around. It was also in honor of my Grandfather's birthday yesterday too. He loved the color green.

So here we go!


Products used:

  • PIXI Beauty Lid Last Shadow Pen in Shell Sheen
  • M.A.C. White Rabbit (Reelers & Rockers palette from Tarten Tale)
  • M.A.C. Family Treasures (Reelers & Rockers palette from Tarten Tale)
  • M.A.C. Gaelic Gold (Reelers & Rockers palette from Tarten Tale)
  • Maybelline Antique Jade
  • Rimmel London Precious Crown (The deep green/black)
  • M.A.C. Kohl Power Eye Pencil in Feline
  • E.L.F. Cream Eyeliner in Black
  • N.Y.C. Volumizing Mascara in Extreme Black


Swatches

Quick break-down:
First I started off applying PIXI Shell Sheen all over my lid, then quickly smudged it out because it does set fast. Next is mostly a bunch of layering of colors, then mimicking them to the lower lash line. I started off after Shell Sheen had set, by applying M.A.C. White Rabbit to the inner corners. Next to White Rabbit, I then blended M.A.C. Family Treasures (a gold) probably up o a third of my eye, I then blended M.A.C. Gaelic Gold (an antique gold) into Family Treasures. Family Treasures and Gaelic Gold pretty much blend seamlessly, very little blending is actually needed. Next I took Maybelline Antique Jade on the final outer third of my eye and blended it into Gaelic Gold. I went back and forth between Gaelic Gold and Antique Jade to get them properly blended. To deepen up the crease I used the dark green/black shade that comes in the Rimmel London Precious Crown quad palette. Finally, I used E.L.F. Cream Eyeliner in Black (love this!) and smudged it to my upper lash line, then used M.A.C. Feline on my lower waterline. For some reason this combo just works better for me. Last, but not least, two coats of N.Y.C. Volumizing Mascara to my upper lashes.

End Result!

24 February 2013

Haul Time!: Target

If it's one thing I've learned, Target is dangerous. Right now they have a ton of cosmetic/polish items marked on clearance. From E.L.F. (you can put that on clearance?) to PIXI. Most of the items however, are with the brands, so keep your eyes on for the red tags!

While I was down one aisle, my Mom had gone off to another aisle, bringing back two other Rimmel London palettes. Now I want to put this out there, my Mom doesn't do make-up. In fact, she's highly allergic to it, including Almay. Not to mention she is colorblind (monochrome stage) as well, yet she always does her best when looking for make-up for me; she just doesn't know what colors she's actually looking at.

So without further ado, here's the haul!

Everything you see, save for one, was on clearance. So like last time, I'll be bolding the actual price I paid along with the retail price from Target.

Rimmel London ($1.98/$3.99) Glam'Eyes Quad Eye Shadow in #026 Precious Crown.  I'll be doing a review on this one for sure being they seem to be black duochromes when I did fast swatches earlier.

Rimmel London ($1.98/$3.99) Glam'Eyes Quad Eye Shadow in #024 Green Sapphire. This one along with another from this haul are going to be appearing in a special post I have planned in March ;x

Rimmel London ($1.88/$3.79) Lasting Finish Pro Nail Varnish in #375 Stiletto Red.

E.L.F. ($.70/$1.00) Custom Eyes Step2 Eye Shadow in #2514 Navy.

N.Y.C. ($1.20/$1.72) In A New York Color Minute Quick Dry Nail Polish in #240 Midtown.

O.P.I. ($8.48/$16.99) Original Nail Envy. Yes, I nearly fell over at the clearance price practically being HALF the original price. I couldn't pass this up.

Maybelline ($2.94) Stylish Smokes in #165S Antique Jade.


Disclaimer: All products mentioned in this post were purchased by myself.
Related Posts Plugin for WordPress, Blogger...