Showing posts with label brands: rimmel london. Show all posts

10 December 2013

Review: Rimmel London Stay Matte Liquid Mousse Foundation

http://beautyparfait.blogspot.com/p/disclaimer.htmlhttp://beautyparfait.blogspot.com/p/disclaimer.html

Review time! Just for the record, photos, save for one, were taken with a Nikon L810 that I'm borrowing right now, and I can say, now I know why Nikon is so awesome.

Anyway, up for review is Rimmel London's Stay Matte Liquid Mousse Foundation. Now, I've used Rimmel concealer before, but never one of their foundations, let alone a mousse foundation. I was both excited and a tad apprehensive due to the fact that when I would try to color match to any of the Rimmel foundations before, the lightest shade would still be too dark for my skin tone.

So, onward to the review!

Rimmel London Stay Matte Liquid Mousse Foundation
A feather light, oil free formula with an airy mousse texture that won’t feel heavy or greasy. Delivers all day shine control and blends flawlessly for a natural looking matte finish. Minimizes the appearance of pores. The weight is over – finally, shine has met its matte.

via Rimmel London

Rimmel London Stay Matte Liquid Mousse Foundation

Packaging: What you get is a white tube that holds 1 fl. oz of product in it. From the center going towards the cap is what appears to be a close color match to what the actual foundation tone is. The twist cap, along with the text and accents is purple, not an over the top purple, but definitely eye catching.

Rimmel London Stay Matte Liquid Mousse Foundation

Ingredients: CYCLOPENTASILOXANE, DICAPRYLYL ETHER, AQUA/WATER/EAU, ISODODECANE, TALC, TRIHYDROXYSTEARIN, DISTEARDIMONIUM HECTORITE, DIMETHICONE/VINYL DIMETHICONE CROSSPOLYMER, SILICA DIMETHYL SILYLATE, ETHYLHEXYL METHOXYCINNAMATE, POLYGLYCERYL-3 BEESWAX, SORBITAN SESQUIOLEATE, TRIMETHYLSILOXYSILICATE, KAOLIN, TRIBEHENIN, ALUMINUM STARCH OCTENYLSUCCINATE, PROPYLENE CARBONATE, PEG-10 DIMETHICONE, CAPRYLYL GLYCOL, POLYPROPYLENE, PHENOXYETHANOL, METHYL METHACRYLATE CROSSPOLYMER, SODIUM CHLORIDE, DIMETHICONOL, LAURETH-4, BHT, TOCOPHEROL.
[May Contain/Peut Contenir/+/-: TITANIUM DIOXIDE (CI 77891), IRON OXIDES (CI 77491, CI 77492, CI 77499)]

Rimmel London Stay Matte Liquid Mousse Foundation

Texture/Formula: Smooth, with a lightness to it. Definitely a mousse feel. It is a little thick, but can be sheered out to a medium coverage.

Shades: There are a total of 8 shades available right now. Light Ivory (091), Ivory (100), Soft Beige (200), Sand (300), Light Porcelain (010), True Ivory (103), Classic Beige (201), True Beige (203)

How to Apply: The site suggests that you can use either your fingertips or a brush to apply the foundation, however the best technique for me has been applying it with [clean] fingers then buffing the foundation in with a brush. And just to be clear, you only need a small amount.

Overall Verdict: I was definitely iffy at first when I got this in the mail from Influenster. Normally the lightest shade that Rimmel has to offer tends to be a shade or two off from my skin tone. I received Light Ivory (091), and while I was on the fence, the tone isn't that far off from my own. I really didn't have high hopes though, first application I used my regular foundation brush, applying it as I normally would. For me, bad idea. Too much went on, and I felt like I had a mask on. I didn't go back to it right away, but when I did, I tried it with my fingers instead. MUCH BETTER. Coupled with a simple buffing with my foundation brush made the foundation work perfectly. It is a light-weight formula. While I normally steer clear of Matte foundations during the cold/winter months simply because I have dry skin, and this foundation will pick up on any dry areas. I've noticed though if I put enough moisturizer on and couple it with a primer, it is not that bad then.
Taken 12/4/13 with my Samsung Galaxy S3. No Filter
.
The biggest plus with this foundation is that it can double as a concealer. When I wear this foundation, I normally top my under eye concealer off with this foundation for extra coverage.

Price: Between $4.99 to $7.99; I haven't seen the foundation in store yet, so I'm basing the price on the other foundations that Rimmel offers.

Availability: Wherever Rimmel London is sold.


http://influenster.com


Disclaimer: Products mentioned in this post were sent to me for testing purposes from Influenster.

18 November 2013

Unboxing: Influenster RoseVoxBox

http://beautyparfait.blogspot.com/p/disclaimer.html

First off, I'm still trying to figure out my other camera, I think I figured out how to get the flash brighter those, so it isn't casting a yellowish tint to everything now. 


Second, I was beyond excited when I found out that I would be receiving a Rose VoxBox from Influenster. Last time I received a VoxBox was over a year ago, before I had the blog! Over a year ago, I was surprised when I opened the VoxBox and I'm still surprised. Pleasantly surprised!

This is simply an unboxing, certain products will have their own reviews coming soon.


Dr. Scholl's For Her Cozy Cushions
Dr. Scholl's® For Her Cozy Cushions
Retails: $12.49

Dr. Scholl's For Her Cozy Cushions help keep feet warm and dry while providing all day comfort. Their multi-layer design helps insulate the foot while two plush layers provide extra cushioning. Cozy Cushions help keep feet dry by absorbing perspiration and offer superior support on hard surfaces.

Unboxing Thoughts?: Can definitely say that I was surprised to see this. Pleasantly surprised. Why? Because I have been thinking about purchasing them for the winter. Can't wait to put them in my boots to try them out!

Lindt LINDOR Milk Chocolate Truffles
Retails: $3.99 (5.1oz bag)

Smooth, Melting, Luscious. When you break the shell of a LINDOR truffle, the irresistible smooth filling starts to melt and so will you. Available in 10 smooth, melting flavors.

Unboxing Thoughts?: I might be one in a small handful of people out there, but I'm not a chocolate lover. I have to be in the mood for chocolate. Besides that, I've had these before, and I can say that I do like them, when I'm wanting chocolate. Last Christmas, I actually became addicted to them.

Kiss Gradation Polishes
Kiss® Gradation Polishes
Retails: $6.99

Give yourself a trendy gradation manicure in no time with Kiss Gradation Polishes. Quick and easy to apply in three easy steps, you will end up with a mani filled with glitter and shine in no time! Available at Walgreens.

Unboxing Thoughts?: Shock! Wasn't expecting this. Had a twinge of disappointment only because I have this already, still unopened to try out. I think the one I already bought might have a better place else where (shhh, it's a secret!).

belVita crunchy Breakfast Biscuits
Retails: $3.69 (box of 5 packets of 4 biscuits)

belVita crunchy Breakfast Biscuits are made with delicious ingredients and carefully baked to release steady energy that lasts all morning. They're a good source of fiber and B-vitamins, contain no high fructose corn syrup, and have 18-20 grams of whole grain per serving and taste great - perfect for on-the-go.

Unboxing Thoughts?: Blueberries... I'm not a fan of blueberries. I like the scent, but not the taste. But, they will be eaten!

Rimmel London Scandaleyes Retro Glam Mascara
Retails: $5.99

The 60s are back in full swing with a thicker, fuller, wide-eyed look! Rimmel London Scandaleyes Retro Glam Mascara brings you a bold, wide-eyed look, fanned out volume, and no clumps for lashes that are up, out, and over the top!

Unboxing Thoughts?: Excitement! Like I don't have enough mascaras already, but anytime I get a new mascara, I'm excited; especially to see if it works as it claims. The name though is a mouthful.

Vitabath Hydrating Lotion
Retails: $7.99

Moisturize your skin with lotion formulated with Aloe Vera, Safflower and Olive Oils for silky soft skin. This hydrating lotion enriches skin with luxurious moisture and a delicate scent. Free from propylene glycol, phthalates, mineral oil, and synthetic color.

Unboxing Thoughts?: Lotion! I'm a lotion hoarder, even though 90% of the time, I forget it. With winter coming around, this is perfect! Never tried anything from Vitabath before, so excited!

http://influenster.com

Disclaimer: Products mentioned in this post were sent to me for testing purposes from Influenster.

06 July 2013

Review: Rimmel London Show Off Lip Lacquer


I hope everyone had a fantastic July 4th if you're in the states! I spent mine at work ;x Which is fine, I did see fireworks on the way home though.

So! While I had been at Walgreens a while ago (maybe 2 weeks or so ago?), I saw that they had got in new products from Rimmel London. Other Walgreens had full displays of various new products, mine however, did not, or they're hiding it in the backroom. They did have the display out for the Show Off Lip Lacquers.
Many have been waiting for these Lip Lacquers to come over state side from the U.K.

What I would love to know is, why did Rimmel change the name from Apocalips to Show Off though. I honestly prefer the name Apocalips. That's just me though.

Anyway, on to the review!


30 May 2013

Review: Rimmel London Fix & Perfect Pro Primer


Not too long ago (month, month & a half maybe), I set out to find another face primer after I had a reaction to the previous one that I had been using. Being careful to check what was listed under the ingredients, I finally found one!

I went back and fourth between a few primers while I was at Target one night, and settled on Rimmel London Fix & Perfect Pro Primer 002. I was actually going to get 001, but it had parabens listed, plus it had a tint to it. I wasn't sure if it was an actual tint or not, but I put it back down after reading the back. 

So, the question is, how does the primer fair? The claims for this is that it is a 5 in 1 primer, but is it really 5 in 1?

Review time!

25 May 2013

Swatch-view: Rimmel London Cocktail Colour in a Flash


Quick post!

Wondering around Walgreens last night, I happened upon a mini-display of Rimmel London's Cocktail Colour In A Flash Nail Polish. From my understanding there IS a larger display that has various items that lovers of Rimmel have been WAITING ages for here in the states.

There are five colors total in the Cocktail Colour collection (on the display it said, exclusive to Walgreens), so after much going back and forth on what color to actually try first.


Rimmel London Cocktail Colour in a Flash
#120 Shirley Temple
Rimmel London Cocktail Colour in a Flash Nail Polish. Colour in a Flash! Intense fully pigmented nail colour, charged with high energy colour pearls.
Rimmel London Cocktail Colour in a Flash

Packaging: For a nail polish, the bottle comes across to be on the small size. In my opinion at least. Then again I'm used to bottles the size of OPI. You get a total of 0.27 fl. oz./8 ml of product. The cap is standard black cap with a hologram sticker of, well, a cocktail on it.

Rimmel London Cocktail Colour in a Flash

The brush is a wide brush, it isn't a blunt end though. It actually curves on the sides. I actually prefer the wide professional brushes that have curves along the sides because, for me, it fits my cuticles better then when a wide brush has a blunt edge to it.

Rimmel London Cocktail Colour in a Flash

Color: I ended up purchasing Shirley Temple (#120), which is an orange polish with a gold shimmer overlay.

Rimmel London Cocktail Colour in a Flash

Formula: Here's the tricky part. The polish itself is sheer, and on the back of the bottle it says, One-coat nail polishes. Perhaps if you don't mind a sheer coat of color and shimmer, one coat is all you'll need and you'll be out the door. But for someone who likes their polishes to be opaque, one coat isn't going to do it! I also noticed that it can be a bit of a fussy polish. Balding in some areas, but definitely no issues with streaking. Also on the bottle, it says that the polish dries in 60 seconds. True. The first coat was dry enough to the touch in about a minute. I ended up doing 4 coats to get it fully opaque or the appearance of it being opaque to me.

Rimmel London Cocktail Colour in a Flash
Natural setting on my camera.
Rimmel London Cocktail Colour in a Flash
Vivid setting on my camera.
Overall Verdict: I definitely do like the polish. It's such a vivid, lively color. Perfect for summer! I do wish the formula wasn't on the sheer side though, having to put so many coats on, even with a polish that says it dries in 60 seconds, multiple coats can hinder the polishes drying time. Besides that, I really want to go back and grab the other four colors.

Price: $2.49

Availability: As far as I know, this is exclusive to Walgreens. I'm sure though, it'll make its way to other locations that carry Rimmel.

19 April 2013

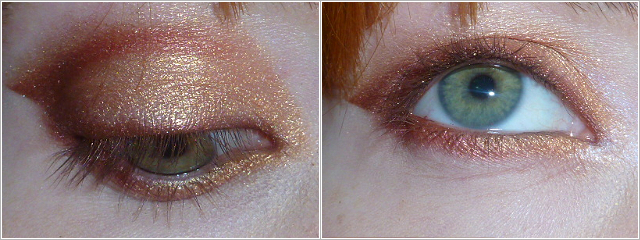
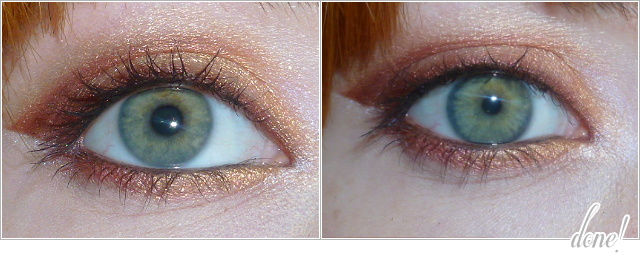
Tutorial: Iron Man Mark 42/47 Inspired Eye Make-up


Red and gold time! Took me a little bit to figure out which Mark this was because I hadn't seen it anywhere despite it being the main armor in Iron Man 3. So far I've seen it as Mark 42 (XLII) and Mark 47 (XLVII). Can be that Mark 47 is simply the latest model of Mark 42. Ok, who's confused now? Raise your hand! I'm just going to call it Mark 42/47 to avoid confusion. 

The primary color for this armor is the gold, with the metallic "hot rod" red becoming an accent color. That's what I tried to do with this inspired look. Hopefully, it came out well. I was rather please with it at least!

Mark XLII/XLVII
1. To start, I primed my eye first using Milani Eyeshadow Primer. Then placed scotch tape, under my lower lashes at the corner of my outer eye so that I could get a nice crisp line. I did take some of the tackiness away by sticking the tape to the back of my hand twice.

2. Urban Decay Twice Baked. I wanted the red that I was going to use to be dark enough, so I start off with a base shadow. Using Twice Baked, I creased the "wing" then blended it into the crease, outer V and then smudged it along the lash line going all the way to the inner corner.

3. NYX Rust. In years past for Iron Man, I've always used Rust as the "hot rod" red, although it really isn't as metallic-y as I would like, it works fine though. I packed this on over Twice Baked, making sure all the brown was covered up.


4. I then removed the tape, getting the nice crisp line that I wanted. Going to Rust again, I smudged that along the lower lash line.

5. For the next steps, I used two different golds. First using Urban Decay Half Baked. I started filling and blending in the bare area going from the outer corner inward.

6. I then went over Half Baked with the gold half of Urban Decay OZ; taking both Half Baked and OZ down along the inner portion of the lower lash line, connecting them both to Rust and blending.

7. Because both Gold colors kind of washed out Rust, I went over again, with Rust to get the red to stand out again. I combined Rust with NYX Pearl Mania in Penny which is similar to Rust, but more glittery. I also took Gold OZ up above the crease, blending it from the tip of the wing around to the inner corner. I then used Illusion from Urban Decay to blend OZ upward.

8. For the inner highlight, I took (again for the Iron Man series!) the white blue shift of Aura from Urban Decay. Not pictured here is that I also took Aura and ran it along the underside of the wing to highlight it.

9. Liner time! I first used Rimmel London Scandaleyes in Blackmail, smudged it into my upper waterline and along my lower waterline. After that I took a very flat, straight eyeliner brush, loaded it with Studio Gear Invincible Onyx eyeliner and gingerly ran it along my lash line.

10. Last, but not least. Mascara!!! I used Studio Gear Impactfull Pro T.L.S. mascara (review coming). Two coats to the upper lashes, then coated the lower lashes. Then, you're done!

Products Used
  • Milani Eyeshadow Primer
  • Urban Decay Twice Baked
  • Urban Decay Half Baked
  • NYX Rust
  • NYX Ultra Pearl Mania Penny
  • Urban Decay OZ
  • Urban Decay Aura
  • Urban Decay Illusion
  • Studio Gear Eyeliner in Invincible Onyx
  • Rimmel London Scandaleyes in Blackmail
  • Studio Gear Impactfull Pro T.L.S. Mascara


15 April 2013

Tutorial: Iron Man Mark 40 Inspired Eye Make-up


So, when I was planning on doing the second Iron Man tutorial, I was originally working with the Mark 2 design. That, however, is practically a chrome look... not exactly inspiring, at least for me. So, when the image of the Mark 40 was released on Facebook, the "Shotgun" armor, I went with that one. Really this could go with any of the silver/chrome/metal looking armors though.
 
This is actually the first time I'm doing anything like this, so I'm going out of my comfort zone, but I'm trying.
 
Mark 40 Hyper Velocity Suit "Shotgun"
 
1. I used Maybelline Color Tattoo in Tough as Taupe as my base. I knew I wanted to "wing" the color of the eye, I used the old scotch tape trick so I could get a straight edge. Extending Tough as Taupe out using an angle brush.
2. Next up, outlining. Using a straight edge liner brush, I gently outlined the crease of the eye using MAC's Carbon. First shot I used an angle liner brush and didn't like the results. I didn't line the entire crease, I skipped over the center, so basically I only lined or cut the edges of the crease.
 
3. Being this is based on Mark 40 which seems to have a slightly blue metal look to it. I used e.l.f. Baked Eyeshadow in Dusk and a flat eyeshadow brush to blend Dusk starting from the crease down, not bringing it down all the way, but fading it down. I tried not to disrupt Carbon as I want the black to stand out. I also didn't bring Dusk out onto the little "wing" that I creased, I simply shaded the outer v of the eye avoiding the other area (does that make sense?).
 
4. Taking Melt My Heart from MAC, I blended it in all over the lid, blending it into Dusk, then going back over with Dusk to make sure that deeper steel blue shade can be seen.
 
5. Of course I can't be happy with just one silver. I really wanted the silver to pop so I took the silver side of Urban Decay's OZ and went over Melt My Heart. Also here, I remembered about my lower lash line. I took the flat liner brush and went half way, as close to my lash line as I could, with MAC Carbon. Then took Melt My Heart along the rest of the lower lash line, also taking it under Carbon, then I repeated the process with the silver side of OZ.
 
6. Taking Rimmel London's Scandaleyes Shadow Stick in Blackmail, I smudged that into my upper lash line then along my lower water line. Feel free to add liner. I still haven't gotten the hang of it, which is why I normally smudge liner onto my upper water line.
 
7. For mascara I used e.l.f. Volume Plumping Mascara, upper and lower lashes. And then, done!

Next one is definitely going to be one of the red and gold armors.

And of course, I forgot to take a photo of the products used. Luckily, most appear in the still photo tutorials ;x

Products Used
  • Maybelline Color Tattoo in Tough as Taupe
  • OZ from the Urban Decay Glinda Palette
  • E.L.F. Baked Eyeshadow in Dusk
  • Carbon from MAC
  • Melt My Heart from MAC
  • Rimmel London Scandaleyes Shadow Stick in Blackmail
  • E.L.F. Volume Plumping Mascara
Related Posts Plugin for WordPress, Blogger...