Showing posts with label brands: sally hansen. Show all posts

16 May 2013

Swatch-View: Sally Hansen Sugar Coat


With texture polishes all the rage now. If you follow me on instagram, I discovered that Target got a bunch of new collections in! YES! Two the collections were from Sally Hansen. The Sugar Coat collection and the Fuzzy Coat collection.

Excited that my Target FINALLY got them in, I got one polish from each. Right now this post is about the Sugar Coat polish. The Fuzzy one will be later on as I have an idea for a design, but I don't have the other color to go with it =\

20 April 2013

Manicure: Peachy Gold

I have a love/hate relationship with peach/coral colors. They look so vibrant in the bottle, but dry down darker. Not looking for a dark peach color! When I was at Target, I came across one of Sally Hansen Insta-dri polishes called Peachy Breeze, figured why not!

I was definitely iffy because of my track records with peach/corals, but luckily Peachy Breeze dried down to exactly as it appears in the bottle! Such a vibrant, spring color! So completely happy with the color.

Now I've used the Insta-dri polishes before, love the colors, get frustrated because they always seem to streak with me, not to mention due to the fast dry down time. They can go uneven easily if the polish isn't applied quickly enough. This might not happen to everyone, but it happens to me.

Anyway, now for the manicure!

I only did an accent nail because of how gorgeous the color is. Originally I was going to do the gold on every nail because I figured the color would dry down darker, but nixed that after seeing it. I used two coats of Peachy Breeze. Although on my right hand, certain nails have a light third coat due to unevenness. This polish can be streaky and cause balding if you apply a second coat too soon.

Accent nail
Accent nail, I applied scotch tape along the cuticles/outer edges of the nail to protect the skin and so that clean up wouldn't be all over the place. I used the sponge method again, instead of using the "dry polish" technique. 

For the gold I used Wet n Wild Fergie Gold Album, starting from the cuticle and stippled up to the middle of the nail, then concentrated around the cuticle again to make that gold more opaque there.

Instead of using gold glitter, I used Pure Ice Dazzle Me, which is a silver glitter with hexagon holographic glitters.

Sealed everything with Sally Hansen Insta-dri top coat and done!

Products Used
  • OPI Nail Envy (not pictured)
  • Sally Hansen Insta-dri in Peachy Breeze
  • Wet n Wild Gold Album from the Fergie Collection
  • Pure Ice Dazzle Me
  • Sally Hansen Insta-dri Top Coat (not pictured)

31 March 2013

Happy Easter! Easter Day Manicure

Hope everyone (who celebrates) is having a wonderful Easter. 

I wanted to get this up before I forget! Yesterday (after several failed attempts) I did my Easter manicure.

No page break this go around! So apologies in advance for such a long post.

Polishes used, *almost* all.
Easter Manicure
Easter Manicure

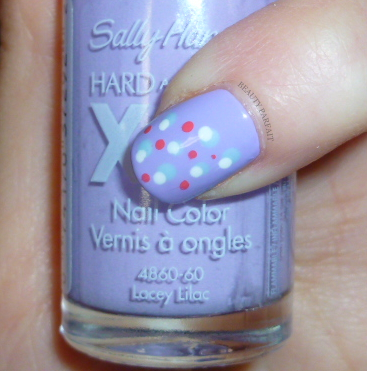
Thumb. Used Sally Hansen Hard as Nails Xtreme Wear in Coral Reef as the base (2 coats). Then B-Right On!, Snow Me White and Lacey Lilac for the dots.

Index. Sally Hansen Hard as Nails Xtreme Wear in Lacey Lilac (2 coats) as the base. Corel Reef, Snow Me White and Breezy Blue for dots.

Middle. Sally Hansen Hard as Nails Xtreme Wear in B-Right On! (3 coats) for the base. Lacey Lilac, Snow me White and Breezy Blue for dots.

Pinky. Sally Hansen Hard as Nails Xtreme Wear in Breezy Blue (3 coats) as the base. Coral Reef, Snow Me White and Lacey Lilac for dots.

Now for my ring finger. This one was FUN (I'm being sarcastic). I had to redo this 3 times. The first time I used a different yellow polish and it was just getting to be too many layers (I was up to 8 and could STILL see the tip of my nail!). So I took that off and used a different yellow, here I thought it was dry, nope, tape stuck to it and pulled the polish up. /sigh REDO! Finally got it dried enough so that the tape wouldn't pull it up.

Polishes used.
NYC In a New York Minute Quick Dry in Leington Yellow (3 coats) as the base. Sinful Colors in Snow Me White for the cracked egg shell (I used scotch tape which I cut upside down Vs into). Sally Hansen Insta-dri in Orange Impulse for the little chickie nose (used a very tiny dotting tool which came in my Fingr's kit). And Nicole by OPI in I'm a Pool For Love for the eyes (I didn't have a black! Wait I don't have a black? I don't have a black polish! :O!).

Finished Product!

11 March 2013

To Dupe or Not To Dupe: Green With Envy vs. Green Apple vs. Innocent

Welcome to another edition of To Dupe or Not To Dupe! For this round, it's a lime green edition. I was actually surprised by how many lime greens I have, but narrowed it down to only three. 

I wasn't expecting the out come though, as the swatches on the nail plate differ drastically than the swatches I did on myself (is that normal?).

Lets jump right to it!

Base coat used O.P.I. Nail Envy, no top coat used.

Starting off with Sally Hansen (Hard as Nails) Xtreme Wear in Green With Envy. Photographing the bottle actually makes it appear darker (this was an issue I was having with lighting), but it's actually a lovely lime green cream, that definitely has a yellow tone to it.

I used two coats to get it fully opaque. No real issues with the application, it went on fairly smoothly, with only minor balding with the first coat which was easily fixed with the second.

Next up is Orly Green Apple. Another cream polish. Unlike the first one, this one definitely comes across as having more of a... blue hue to it. It photographs as being more of a mint color and to me, falls into the cool field.

Application with this one was tricky. The formula was very runny, so I had to keep going back to the bottle to get the excess off, it would just flow down and pool onto the nail. The good thing though, I only had to use two coats, despite the pooling of polish.

Finally, Sinful Colors in Innocent. The third cream. This one is a light moss yellow-green. Innocent definitely is more of a yellow tone green compared to Green With Envy.

The formula on this one was thicker than the other two, other than that there weren't any other issues. Might have been thicker, but it was the one that gave me fewer issues. Two coats were used to get it fully opaque.

The comparison.

I certainly have to say, the way these colors translated to the nail plate, were so off it isn't even funny. I was definitely surprised by the out come of this because they look SO very similar. Two have a yellow tone to them (one more so than the other) while the other is a cool tone (mint) green. In the bottles it's even difficult to tell, although Green Apple looks slightly off even there.

Would I call them dupes? Absolutely not. The three of them are very different.

Price Range: Orly Polishes go for $8.50 on the Orly website. Sinful Colors go for $1.99 at Walgreens. Sally Hansen Xtreme Wear start from $2.12 and up (depending on where you shop).

Disclaimer: Products mentioned in the post were purchased by myself. None of the links featured are affiliates.

05 March 2013

Weekly Nails: B-Right Greeny

This is going to be a super duper quick post. Nothing fancy or anything like that (apologies!). I'm trying to find my tripod to MAYBE do a tutorial. Maybe. Can I stress the maybe? Providing I FIND my tripod.


All I knew is that I wanted to use the Hard Candy polish I purchased on Friday (Itzy Glitz collection), but after swatching it, I didn't feel like doing multiple layers to get it opaque. Next best thing? Layer it! Going through my lime green mini-collection to find the right one. 

Base coat used was O.P.I. Nail Envy. Top coat, Inm Out The Door.

After letting that dry, I began with Sally Hansen Hard as Nails Xtreme Wear Nail Polish in B-Right On!. B-Right On! is a vivid, yellow-green cream polish. Two coats were used for it to be opaque (no clean up yet!). 

After letting that dry, I next began to layer on Hard Candy Teeny Greeny (lime green metallic with gold/copper flecks) on top of B-Right On! Three coats were used. (Annnd now clean up!)


And there you have it! Definitely an easy one and I love the effect with the layering. I'm not sure though, but I do believe B-Right On! is discontinued. I haven't been able to find it on any site that I was able to check.

31 January 2013

Monthly: January Favorites

Took me a little while to put this together, but I'm finally done! This is mainly a "picture" post, it's pretty much self explanatory. All the items listed behind the read more, are items that I have been using constantly through the month of January. Hopefully the read more works below. 


30 January 2013

Weekly Manicure: Strobe Rose

Being last night I posted my manicure from last week, I figured I would post my very current manicure (newly done last night). Let me just put it out there now, for me to do just plain nails (aka one nail polish and only one), I'm mighty bored then, or indecisive with what to actually do.

I may do a photo tutorial for this one later one because I loved how it came out. It was purely just me grabbing polishes from my stash and just winging it.

(l-r) Steady as she Rose, Back in my Gloria Days..., Strobe Light
Base coat used Revlon's Post Trauma Nail Treatment.

First I did three coats of O.P.I. Steady as She Rose (Pirates of the Caribbean LE). I was just going to do two coats, but those two appeared streaky and uneven for me, so a third was needed. I did let each coat dry in between or at least until they were semi-dry for the next coat. The third coat I allowed the polish to dry even more being I was going to use the sponging technique.

Next I used Nicole by O.P.I. Back in my Gloria Days... (Modern Family LE) for the sponge gradient. This polish is on the thin side so it required a bit of layering to get it opaque enough). I lost count of how many layers it took after 2. Trial and error, I discovered after so many layers of polish, don't continue to use the same side of the cosmetic sponge, the gradient effect is slightly lost on my right hand because the polish was becoming thicker on the sponge.

Clean up around the cuticles was next, sponging can be messy sometimes.

Second to last, I promised not to do an over kill with Sally Hansen's Strobe Light (seriously, I love this polish!), so I limited it to my ring fingers for accent. I believe it was the right touch. Only one layer used.

Lastly I topped everything off with Inm Out the Door top coat.

End result?


29 January 2013

(Last) Weekly Manicure: Maroon Gold

I actually forgot to post this last week for my manicure series (oops!), my co-worker actually named this manicure for me.


Base coat used, Revlon's Post Trauma Nail Treatment. After letting that dry, I used two coats of Orly's Happily Ever After. After letting that dry, I cleaned up around the nail and cuticle, then started the opposite dry brush gradient (I watched Lucy's Stash tutorial on glitter gradient) using Wet n Wild Chrome polish in A Show at the Palladium (let me know if you know why I bought this!). I started at the cuticle then would just drag the brush up towards the tip of the nail and just kept building from there on each nail.

Letting that dry, I wanted some more sparkle, which is when my Sally Hansen Strobe Light comes in. Light layer of that over each nail, then I topped it off with Inm Out the Door.

End result?


Disclaimer: Products mentioned are my own.


Follow my blog with Bloglovin

12 January 2013

Dupe Alert! Back In My Gloria Days...

I figured I wouldn't get my hands on any of the Modern Family polishes from Nicole by O.P.I. until 2 months after the collection was released. Lucky me that my local Target ($7.04) actually had a full display. Most of the polishes in the collection I have polishes that are either exact dupes or close to (this even came from my Mother!). I wasn't sure about one though. Back In My Gloria Days... I couldn't recall if I had a dupe for this or not, so I ended up getting it.

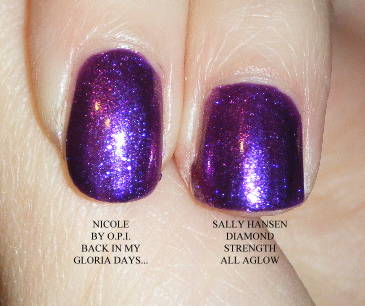
When I got home and went through my nail polish collection (and there shall be a post about that), I did find a dupe. Sally Hansen's Diamond Strength polish in the color All Aglow comes across, in my eyes, as a spot on dupe.

Back In My Gloria Days... vs. All Aglow
Back In My Gloria Days...
Diamond Strength in All Aglow
It's hard to tell in the bottle because of how the Nicole by O.P.I. is shaped, Back In My Gloria Days... comes across as being darker because of this, but that's not the case.

Taking the brushes out of the bottles, Back In My Gloria Days... appears to be a bit darker, with a bluer shimmer, while All Aglow comes across purple with a pinkish blue shimmer.

And with that in mind, onto the swatches!

I apologize for the messy swatches, but I did these quickly (ignore the wonkiness that is my middle nail). Both have two coats over the same base (Revlon Post Trauma Nail Treatment), with no top coat. I had no trouble with application, it just depends on how much you get onto the brush. I truthfully can't see much of a different between the two. Perhaps Back In My Gloria Days... may have a tad bit more blue sheen due to the flash, but that could also be how I have my nails angled.

So if you can't get your hands on Back In My Gloria Days... from the Modern Family collection, may I then suggest Diamond Strength in All Aglow for a dupe.

Disclaimer: Products mentioned in this post were purchased by myself.

10 January 2013

Weekly Manicure: Charismatic Light

Figure I'd kick off a weekly series being I tend to switch my polish up on that type of basis. Save for my New Year's nails which lasted from 12/30 to 1/7, I think that's a record for me with polish.

Originally, I wasn't going to make a post with this, but I got so many compliments at work with the combination, so why not.

(L) Charismatic, (R) Strobe Light
For my base coat I used my Nicole by O.P.I. Strengthener Plus. This time around I applied two coats rather than just one.

I let both coats dry, then applied two coats of Revlon's Charismatic, which is a shimmery apricot color. Allowing both coats to dry I then applied my favorite, Sally Hansen Xtreme Wear in Strobe Light.

Lastly, I used Inm Out The Door as my top coat. I probably could have done two coats of it as the top doesn't feel very smooth. I can tell there's glitter from Strobe Light trying to break through.


End Result.

Disclaimer: Products mentioned in this post were purchased by myself.

03 January 2013

New Year's Manicure

I'll be honest, I wasn't sure what to post first after the introduction. Only one thing I could think of, my New Year's manicure. Now I apologize in advance for the photo quality. I'm still trying to figure this out with lighting, background, etc. And please, if you have any tips, feel free to comment!

Freshly taken December 30, 2012

Loves Me Not

What I haven't photographed are the polishes I use for my base and my top coat. After prepping my nails, I applied a new base coat; Nicole by O.P.I. Strengthener Plus which I actually got from a store called Five & Below for $3.00

Next came the base polish, Sally Hansen Complete Salon Manicure in Loves Me Not. I'm not actually sure if this is still available any longer or not as I don't see it on the website, I also bought this when it was on clearance at Target. I applied two coats to make sure it was opaque. The one thing I did notice with the first application was that there was slight balding (mainly by the cuticles) depending on how much product was actually on the brush.

Going Platinum
After letting that dry, I contemplated between sponging on the tips a gold or a silvery color. I ended up going with the silver-ish color instead. I used from Fergie's line from Wet n Wild, Going Platinum. In my opinion, this color is absolutely gorgeous, not a pure silver, it seems to have a gold tint to it as well as silver, it just depends on how much you layer on. I used a cosmetic sponge to get that onto the nail, trying not to go all the way down the nail. I believe I sponged on two coats, the second coat I tried to concentrate closer to the tip of the nail. In my experience, this polish can be rather opaque, especially with sponging onto a dark color. Getting a gradient effect can be achieved providing you have a light touch (which I didn't because I didn't know how this was going to work before I started on my nails).
Strobe Light

Before the final touch, I cleaned up around my cuticles with nail polish remover (with acetone) and an EcoTools eyeliner brush (love this method instead of using a Q-Tip).

Finally, the polish that I've been in love with ever since I picked it up near the price scanner at Target (yup, that's exactly where I found it). Sally Hansen Hard as Nails Xtreme Wear in Strobe Light. No words can describe how beautiful this polish is. It seems to have micro-fine glitter that comes across as mauve/pink in the bottle with larger flecks of glitter mixed in. The larger flecks though, are holographic pieces. No matter how many photos I took of this polish, both on my nails and the bottle alone, my camera couldn't do it justice. I applied one thin layer all over the nail, then applied a thicker layer over Going Platinum.

Last but not least, I applied my top coat of choice Inn Out The Door. I actually prefer this top coat over Poshe which I used to use. Preforms the same exact way and the price, in my opinion, is better (between $3.99-$4.99 depending on where you look). This is all personal preference though.

It's now past midnight where I live on January 3rd and the manicure is still holding strong, no chipping has occurred, just a bit of nail growth and I'm not even sure if that's visible.

Taken on January 3, 2012
So, there's my first real beauty post. Hopefully it wasn't long.

Thank you for stopping by!
Related Posts Plugin for WordPress, Blogger...