Showing posts with label brands: pure ice. Show all posts

20 April 2013

Manicure: Peachy Gold

I have a love/hate relationship with peach/coral colors. They look so vibrant in the bottle, but dry down darker. Not looking for a dark peach color! When I was at Target, I came across one of Sally Hansen Insta-dri polishes called Peachy Breeze, figured why not!

I was definitely iffy because of my track records with peach/corals, but luckily Peachy Breeze dried down to exactly as it appears in the bottle! Such a vibrant, spring color! So completely happy with the color.

Now I've used the Insta-dri polishes before, love the colors, get frustrated because they always seem to streak with me, not to mention due to the fast dry down time. They can go uneven easily if the polish isn't applied quickly enough. This might not happen to everyone, but it happens to me.

Anyway, now for the manicure!

I only did an accent nail because of how gorgeous the color is. Originally I was going to do the gold on every nail because I figured the color would dry down darker, but nixed that after seeing it. I used two coats of Peachy Breeze. Although on my right hand, certain nails have a light third coat due to unevenness. This polish can be streaky and cause balding if you apply a second coat too soon.

Accent nail
Accent nail, I applied scotch tape along the cuticles/outer edges of the nail to protect the skin and so that clean up wouldn't be all over the place. I used the sponge method again, instead of using the "dry polish" technique. 

For the gold I used Wet n Wild Fergie Gold Album, starting from the cuticle and stippled up to the middle of the nail, then concentrated around the cuticle again to make that gold more opaque there.

Instead of using gold glitter, I used Pure Ice Dazzle Me, which is a silver glitter with hexagon holographic glitters.

Sealed everything with Sally Hansen Insta-dri top coat and done!

Products Used
  • OPI Nail Envy (not pictured)
  • Sally Hansen Insta-dri in Peachy Breeze
  • Wet n Wild Gold Album from the Fergie Collection
  • Pure Ice Dazzle Me
  • Sally Hansen Insta-dri Top Coat (not pictured)

17 April 2013

Video Tutorial: Metallic Hot Pink & Gold Manicure

I'm revisiting my metallic hot pink and gold manicure and this time, I actually did a video tutorial! Ha ha!

I did my very best with the tutorial, but my lighting isn't the greatest, I kept getting in the way of the light from behind me. Whoops!

Anyway, enjoy! :D


Products Used
  • OPI Nail Envy
  • Hard Candy Little Hottie
  • Wet n Wild Fergie Gold Album
  • Pure Ice Endless Fortune
  • Wet n Wild Fergie New Years Kiss
  • Wet n Wild Fergie Glamorous
  • Sally Hansen Insta-dri Clear Coat Top Coat

For Clean Up
  • Target Nail Polish Remover
  • EcoTools Angle Eyeliner brush
 

11 April 2013

Weekly: Current Manicure!

After three failed attempts at manicures last night, seriously what's wrong with me? I kept smudging the polish on my left hand, ugh! Ever have that happen? Working on a manicure then smudge city? So frustrating!

Anyway, this wasn't the originally planned manicure I was doing last night. It just, sort of, happened? Of course, after 3 fails, I forgot to photograph how I did this. I think it's pretty simple. FYI, there is a dupe alert here though. 

Polishes Used:
  • Wet n Wild Fergie Glamorous
  • Wet n Wild Fergie Gold Album
  • Hard Candy Itzy Glitzy Little Hottie
  • Pure Ice Endless Fortune
Being I forgot to photograph the tutorial, I'll try to give step by step instructions. It's pretty simple, I think so at least, and I'm sure there are plenty of other tutorials out there explaining this better than me!

Step 1. Base coat! I used OPI Nail Envy, then allowed it to dry.

Step 2. Apply the color of your choice for the base. I decided on Hard Candy's Little Hottie from the Itzy Glitzy collecion, two coats were used. Allow both coats to dry enough to move onto step 3.
FYI, Little Hottie is almost an exact dupe for Nicole by OPI's Scarlett from the Selena Gomez collection. There is a very, very subtle difference, but if you aren't a polish-a-holic, you won't notice it.
Step 3. Sponge time! I use the sponge technique to do the gold gradient. I take the thickest edge of the cosmetic sponge and actually rip little pieces off of it so it isn't perfectly straight. Using Gold Album, I slather that onto the sponge then start to stipple it onto the nail going only half way down the nail. Trying to twist the sponge around before placing the polish so that nothing appears straight. Then I go back a second time, but only applying the gold closer to the tip of the nails, so the color is more opaque.

Step 4. Taking Pure Ice's Endless Fortune, which has diamond hologram glitters in it. This is actually a little tricky because of the hologram glitters. I only wanted to use just the regular gold glitter in the bottle. So battling to get the diamond glitters off the brush, once that's accomplished (this is probably the time consuming part with having to re-dip the brush to get the large glitter off). If you have a regular gold glitter polish with a clear base, more power to you! Anyway! You just apply the gold glitter over the gold gradient that you just did, going just a little lower then where the gradient ends.

Step 5. This is optional of course, I wanted a different size glitter, so I ended up using Glamorous. Not terribly easy because the base is thick, and you don't always get the larger glitter onto the nails the first go around. For my pinkies I actually ended up using a dotting tool to place the gold circle glitter into place. Then for the other fingers, I just try to manipulate the glitter to the edge of the brush for placement.

Step 6. Apply top coat and your done!

Not difficult, I just ended up making it more challenging for myself haha.

End Result!


05 April 2013

Swatch-fest: Pure Ice


Ok! First, the header has been changed as well as... BUTTONS! I'm still trying to decide if I should just make a new YouTube channel rather than using the one that I've had since... forever.

Second, I now have a tripod that WON'T BREAK or HIDE! No more shaky camera! I'm still working on angles for nail swatches.

Third, I'm working on my March Favorites. Definitely will have a video for it as well :D

Anyway, I went to Walmart earlier, and ended up getting four polishes... three of which were Pure Ice. I actually sat on the ground trying to figure out which ones to get. Trying to resist any greens. I survived!  

So this is going to be a mini-swatch-fest. No page breaks.

Pure Ice Nail Polish
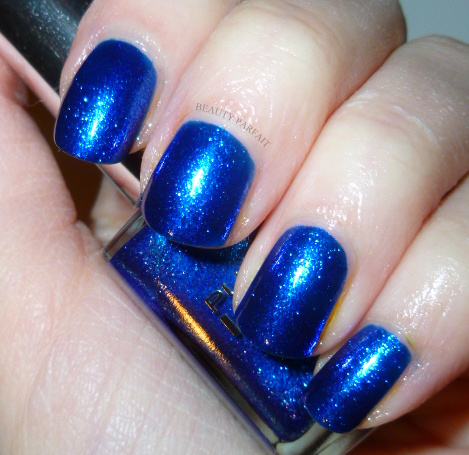
Deja Vu. A royal blue, that in the bottle looks like it has purple/magenta sparkles or duochrome. On the nail though I didn't notice it too much. The formula was perfect fine, 3 coats is all it took to get it opaque.

Pure Ice Nail Polish
Endless Fortune. Gold micro glitter with holographic diamond glitters. This is a clear base. I ended up layering it on top of another Pure Ice polish that I own, Excuse Me. It takes a little to get the large diamond glitters to place themselves out as they seem to want to group together.

Pure Ice Nail Polish
Come Closer. Magenta bar glitter with blue bar glitters mixed in. I thought this one would actually have a clear base, but it has a magenta base to match the dominate glitter in the bottle. Fairly sure that with enough layers it could be opaque. I ended up layering this one over another Pure Ice I have, Watermelon Ice.

Pure Ice Nail Polish Come Closer
Close up of Come Closer


13 February 2013

Haul: Nail Polish from Walmart

Today has been an up and down day for me. Craziness at work, then excitement on twitter. Truth be told, I'm just now figuring out my other camera that I've had for, I believe, 3 years! I figured out how to take close up macros without it distorting on me. The only thing I'm having an issue with is the flash. I would just love to use one camera!

ANYWHO! My Mom and I took a trip to Walmart, and while I was in awe of the FLOWER by Drew Barrymore display, going back and forth to the display, driving my Mother bonkers. I ended up buying three polishes... not from Flower Beauty. Eep! Maybe next time?


I was originally only going to purchase two (Pure Ice & the N.Y.C. polishes), but the CoverGirl Polish caught my eye.

Covergirl Outlast Stay Brilliant Nail Gloss (yes the bottle says gloss) in Timeless Rubies ($4.97). This isn't a ruby color though, I'd have to say this is more along the line of a rose copper color with silver micro glitters. It translates darker in the bottle than in real life. In the bottle it almost comes across as having a slight duo-chrome, which could hold true with the way the light hits the polish giving it more of a rosy appearance than copper. It's really hard to describe, but I fell in love with the color and can't wait to wear it.

N.Y.C. (New York Color) Long Wearing Nail Enamel in Pink Promenade ($.97). A deep hot pink (with how the flash kept hitting it, I'd say it has a blue hue/undertone to it) creme. It is however, streaky. I had to add a third layer to smooth everything out on the nail plate.

Pure Ice in Come Closer ($1.97). This one is one of the newest 2013 polishes. On the Pure Ice website, Come Closer is described as soft pink hex glitter with light pink & silver holo diamonds in a clear base. This is, without a doubt, true to words. It is gorgeous and I can't wait to wear it. I'm hoping to wear this over another color for Valentine's Day.


Disclaimer: All products mentioned in this post were purchased by myself.


Related Posts Plugin for WordPress, Blogger...