Showing posts with label brands: milani. Show all posts

31 October 2013

Press Release: New Milani Limited Edition Collection


This November, Milani will be released 6 limited edition shades to the 12 HR Wear Eyeshadow Pencil line!

This collection will be available at select CVS, Meijer and HEB stores. It will also be available at www.milanicosmetics.com.


Disclaimer: Taken directly from Milani's press release. Photos courtesy of Milani. I do not claim ownership of anything that is written above.

30 August 2013

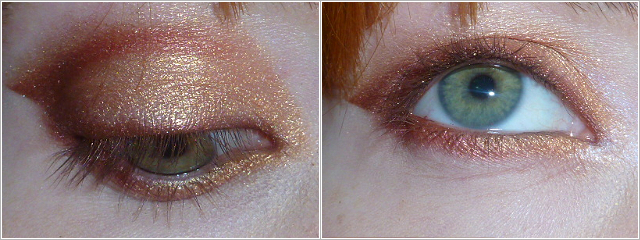
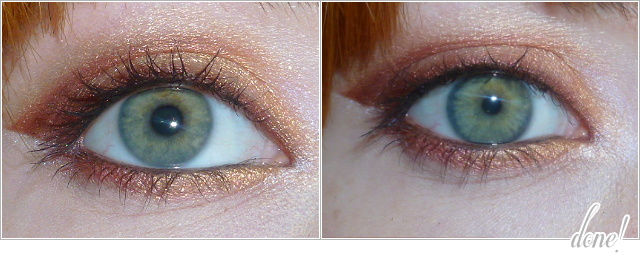
Eye of the Day: The Crash of Honey

The Crash of Honey. The Crash of Honey? I'm not really sure what I was thinking when I came up with that one, but I'm going with it!

Anyway, I hope everyone has a fantastic Labor Day weekend if you are state side, if not, I still hope you all have a fantastic weekend! For me... I'll be attempting to make home made marshmallows tomorrow being my work schedule this weekend is backwards. No work Saturday, but working Sunday. However! I'm off Monday xD The goal for this weekend besides marshmallows is to organize my nail polishes... I'm actually going to even attempt a spreadsheet for them.

My second goal is to get more reviews up. I've been slacking on them and I even know that. So I'm hoping this weekend, especially Monday, I'll be able to catch up.

Before I start rambling, on to the eye of the day! This is the look I wore yesterday to work.

Products Used
  • Milani Eye Shadow Primer
  • Beaming Reflection from the PixiGlow Collection
  • Honey from Urban Decay  Deluxe Shadow Box
  • Crave from Urban Decay Naked Basics
  • e.l.f. Cream Eyeliner in Black
  • Walk of Shame from Urban Decay Naked Basics
  • Venus from Urban Decay Naked Basics
  • Urban Decay 24/7 Glide-On Eye Pencil in Crash
  • Jordana Best Volume Extreme Volumizing Mascara in Black


17 July 2013

Press Release: Milani Coming Up Roses Powder Blush


This collection will be available during the month of August (or sooner depending on the retailer) at select CVS, Walgreens, Meijer and Fred Meyer stores. It will also be available on www.milanicosmetics.com.

27 June 2013

Press Release: Milani Cosmetics New Limited Edition Nail Collections

Milani Cosmetics New Limited Edition Nail Collections


Milani is happy to announce the launch of two new limited edition nail collections: Fantastical Plumage and Retro Glam. Both collections will be available at select CVS and Meijer stores during the month of August. Please note that some stores might put up the collections before August. Both collections will also be available online at www.milanicosmetics.com.

Milani Cosmetics New Limited Edition Nail Collections

Milani Cosmetics New Limited Edition Nail Collections

20 June 2013

Pictorial: Rockstar Venus Eye of The Day


Pictorial time! This one is for the eye of the day that I posted here from June 15th. I've dubbed it Rockstar Venus, I originally was going to dub it Half Baked Rockstar, but I didn't know how that would pan out haha. 

I ever, so slightly made two changes to it, only because I couldn't find one product (it went MIA) and I accidentally grabbed a different mascara. Neither one really make that big of a difference though. 

So lets start!


Step 1. Priming the eye. I used Milani's Eye Primer. Let it dry for thirty seconds (or more), otherwise if you apply shadow too quickly without letting it set, there will be creasing (I learned the hard way when I first tried it).


Step 2. I started off applying Urban Decay Half Baked (mine is from the Get Baked mini palette) to the center of the eye lid, avoiding the outer and inner corner. Then doing the same to below the lower lash line. This is entirely personal preference though. You can take Half Baked or anything close to it all over the eye lid if you want.


Step 3. Next is Urban Decay Rockstar (from the Mariposa palette), starting at the bare area of the outer corner, then blending it into the crease. I actually trailed it along the crease so that it would almost go into the inner corner. This is just something that I like to do when I'm using a gold-ish color, I just use a smaller brush so that it isn't blending into the gold near the inner corner. Back to the outer corner, I slowly start to build up Rockstar and blend it into Half Baked, bringing it closer to the center of the eye lid, but ending it before hit reaches there. And again, bringing Rockstar down to the lower lash line and blending it into the Half Baked that is there.


Step 4. Taking Urban Decay Crave (from Naked Basics), I only blended this into the outer V. Then repeated the same to the lower lash line, only blending it into the very outer corner there.


Step 5. Next is the inner corner! Using Urban Decay Venus (from Naked Basics), I blended this up into Half Baked, and ever so slightly into the edge of Rockstar. Repeating the same process to the lower lash line.

Step 6. (Not Pictured) Blending Walk of Shame, which matches my skin tone, from Rockstar up to the brow bone to get rid of any harshness above the crease. I normally go back and forth between Walk of Shame and Rockstar above the crease in order to get the right amount of smokiness that I want.


Step 7. Lining the eyes. Originally I had used e.l.f. cream eyeliner on the upper lashes, but I couldn't find it, so I just smudged Urban Decay 24/7 Glide-on eyeliner in Rockstar into the lashes, then lined the lower water line with it as well.

Step 8. (not pictured and optional) Curl lashes! I actually did this when I originally did the eye look, but didn't do it with the pictorial.


Step 9. And this is where I grabbed the wrong mascara, no biggie though. I used Maybelline The Falsies Volum'Express Big Eyes Mascara (lower lashes) and Wet n Wild Mega Impact Mascara for the upper lashes (2 coats). And then done!


15 June 2013

Quick Post: Eye of the Day June 15th


This is a quick post like graphic says. I got home late from work, hence why, quick post! :D Good news is, I think I finally figured out how to keep my curls in so that they don't fall. And holy moly, did they stay put! Last time I wore them, which was Thursday, they fell after, roughly, two hours. That's a different post all together though. For now, eyes of the day!

If anyone would like to see a pictorial for this, please let me know! I'll probably do it anyway :D
 

Products used
  • Milani Eyeshadow Primer
  • Venus from Urban Decay (Naked Basics)
  • Half Baked from Urban Decay
  • Rockstar (eyeshadow) from Urban Decay (Mariposa)
  • Crave from Urban Decay (Naked Basics)
  • Walk of Shame from Urban Decay (Naked Basics)
  • e.l.f. cream eyeliner in Black
  • Urban Decay 24/7 Glide-On Eye Pencil in Rockstar
  • Maybelline The Falsies Volum'Express Big Eyes Mascara (lower lashes)
  • Maybelline Volum'Express The Rocket (upper lashes)

20 May 2013

Review: Milani Eyeshadow Primer


Ok, so I got rather distracted because I'm watching The Hobbit ;x Seriously, I've had it since Easter and haven't had a chance to actually watch it. Suppose it was a good thing my cable went out then!

Anyway, enough of that, review time! Finally posting my review of Milani's Eyeshadow Primer.

So, onward and upward to the review!

19 May 2013

Eyes of the Day: Naked 2 Venus

I'm back with my eyes of the day or eye of the day, whichever works better! 

I can happily say that I have in my possession the Urban Decay Naked Basics palette now! Huge, huge thanks goes to nuclear_beauty on instagram who held the giveaway!

Going to work on Saturday, I knew that I wanted to do a nice smokey eye, but a neutral smokey eye. Normally I go for the metallics, shimmers and glitters type of smokey eyes, but due to the fact that Saturday was going to be rather crazy at work, I wanted to tone it down. 

I apologize in advance for not doing a pictorial for this look, I was in a rush having to be at work by 4:30pm :x

Products Used
  • Milani Eyeshadow Primer
  • Urban Decay Naked Basics
  • Urban Decay 24/7 Glide-On Eye Pencil in Rockstar
  • Studio Gear Impactfull Pro T.L.S. Mascara

Step 1. I primed the lids using Milani's Eyeshadow Primer (review on this tomorrow!). Waited 30 seconds for the primer to set.

Step 2. After the primer set, I tight lined (using the Q-Tip method) my upper lash line with Urban Decay 24/7 Eye Pencil in Rockstar. Normally I just shut the eye and smudge, but I've come to notice that this is the cause of the flaking I've been experiencing. And here I was blaming my mascaras!

Step 3. I then took Venus from the palette and used that as my inner corner highlight.

Step 4. Then taking Faint all over the lid leaving a small space between Faint and Venus because I wanted a blending color between the two. I also took Faint above the crease slightly.

Step 5. The blending color between Venus and Faint, I used Naked 2. It comes across as a light color but is easily buildable, perfect bridge between the two.

Step 6. Getting that smokiness. Using Crave, I slowly blended it into Faint going towards the center of the lid, trying to get it as close to the lash line as possible, and then taking it into the crease.

Step 7. For the brow bone and to blend the remaining Faint above the crease, I used Walk of Shame.

Step 8. Lined the lower lash line to mimic my lid, then used Rockstar on the lower water line.

Step 9. Curl the lashes!

Step 10. Added two coats of Studio Gear Impactfull Pro T.L.S. Mascara.

End result?

Of course I can't get away without my mascara TRYING to act like eye liner. Sigh. This happens when I'm in a hurry ;x


23 April 2013

Press Release: Wait! New release from Milani for May?! Woohoo!


From Milani Cosmetics -

We are excited to announce that next month (May) we will be launching two limited edition collections: Naturally Chic Shadow Eyez 12 HR Wear Eyeshadow Pencils and Tantastic Face & Body Baked Bronzers.

Naturally Chic Shadow Eyez 12 HR Wear Eyeshadow Pencils will be available at select Walgreens, HEB, and Fred Meyer stores. The collection will also be available on www.milanicosmetics.com.

Tantastic Face & Body Baked Bronzers will be available at select Walgreens, HEB, and Fred Meyer stores. The collection will also be available on www.milanicosmetics.com.


Ok, who is excited?! I already have my eye on Golden Bronze, Espresso Line and Sand Dunes. AND Fantastic Illuminator, hopefully it won't be too dark. Yes! I'm already shopping :D

What product[s] does everyone have their eyes on?

19 April 2013

Tutorial: Iron Man Mark 42/47 Inspired Eye Make-up


Red and gold time! Took me a little bit to figure out which Mark this was because I hadn't seen it anywhere despite it being the main armor in Iron Man 3. So far I've seen it as Mark 42 (XLII) and Mark 47 (XLVII). Can be that Mark 47 is simply the latest model of Mark 42. Ok, who's confused now? Raise your hand! I'm just going to call it Mark 42/47 to avoid confusion. 

The primary color for this armor is the gold, with the metallic "hot rod" red becoming an accent color. That's what I tried to do with this inspired look. Hopefully, it came out well. I was rather please with it at least!

Mark XLII/XLVII
1. To start, I primed my eye first using Milani Eyeshadow Primer. Then placed scotch tape, under my lower lashes at the corner of my outer eye so that I could get a nice crisp line. I did take some of the tackiness away by sticking the tape to the back of my hand twice.

2. Urban Decay Twice Baked. I wanted the red that I was going to use to be dark enough, so I start off with a base shadow. Using Twice Baked, I creased the "wing" then blended it into the crease, outer V and then smudged it along the lash line going all the way to the inner corner.

3. NYX Rust. In years past for Iron Man, I've always used Rust as the "hot rod" red, although it really isn't as metallic-y as I would like, it works fine though. I packed this on over Twice Baked, making sure all the brown was covered up.


4. I then removed the tape, getting the nice crisp line that I wanted. Going to Rust again, I smudged that along the lower lash line.

5. For the next steps, I used two different golds. First using Urban Decay Half Baked. I started filling and blending in the bare area going from the outer corner inward.

6. I then went over Half Baked with the gold half of Urban Decay OZ; taking both Half Baked and OZ down along the inner portion of the lower lash line, connecting them both to Rust and blending.

7. Because both Gold colors kind of washed out Rust, I went over again, with Rust to get the red to stand out again. I combined Rust with NYX Pearl Mania in Penny which is similar to Rust, but more glittery. I also took Gold OZ up above the crease, blending it from the tip of the wing around to the inner corner. I then used Illusion from Urban Decay to blend OZ upward.

8. For the inner highlight, I took (again for the Iron Man series!) the white blue shift of Aura from Urban Decay. Not pictured here is that I also took Aura and ran it along the underside of the wing to highlight it.

9. Liner time! I first used Rimmel London Scandaleyes in Blackmail, smudged it into my upper waterline and along my lower waterline. After that I took a very flat, straight eyeliner brush, loaded it with Studio Gear Invincible Onyx eyeliner and gingerly ran it along my lash line.

10. Last, but not least. Mascara!!! I used Studio Gear Impactfull Pro T.L.S. mascara (review coming). Two coats to the upper lashes, then coated the lower lashes. Then, you're done!

Products Used
  • Milani Eyeshadow Primer
  • Urban Decay Twice Baked
  • Urban Decay Half Baked
  • NYX Rust
  • NYX Ultra Pearl Mania Penny
  • Urban Decay OZ
  • Urban Decay Aura
  • Urban Decay Illusion
  • Studio Gear Eyeliner in Invincible Onyx
  • Rimmel London Scandaleyes in Blackmail
  • Studio Gear Impactfull Pro T.L.S. Mascara


07 April 2013

Tutorial: Iron Man Mark 1 Inspired Eye Make-up


Raise your hand if you knew this was coming! No? Darn. Well, if you know me, then you'll know I'm a massive fan of Iron Man. Comics, cartoon, anime, movies.

Anytime I went to the movies for either the first, second or even the Avengers movie, I've always done my makeup and nails up. Hope I'm not the only one out there that does this haha.

Now that I have the blog, I figured with Iron Man 3 set to come out May 3rd (27 days!), I'm going to give a shot at doing a series that's been inspired by the suits of armor. 

So to kick off the series (should there be a name for it?), I'm starting with the Mark 1. This suit of armor is the bulk armor that Tony builds in a cave during the first movie. It's very grunge-y, steel and metal. 

Photo courtesy of Google
Tony Stark was able to build this in a cave! With a bunch of scraps! 
 
 
First off, bare eye. Then I used Milani Eyeshadow Primer all over the lid.

Then, taking the White with blue shift of Aura from the Urban Decay Glinda palette, I applied that to the inner corner. With that blue hue to it, I figured it would serve the purpose of representing the arc reactor's glow.

Next, I decide to give a cut crease a try. First time doing this. I used E.L.F. Baked Eyeshadow in Dusk, which is a charcoal grey with shimmer, to map out the crease.


Then I went over Dusk, with MAC's Carbon, a matte black. More or less concentrated it on the outer V.

After that I began to do the fill in. I started off with the silver side of OZ from the Glinda palette, placing it next to Aura. I stopped OZ at the center of the lid.

Next to OZ, and for the rest of the fill in I used MAC's Melt My Heart.

I then took Dusk again and started to blend it into Melt My Heart, to deepen it a bit more so it wasn't a stark silver. I also went over the cut crease again with Carbon to reemphasize it again.

Next comes eyeliner. I used my Elite Models Intensity Eyeliner in Secret Grey and smudged it into my upper lash line and waterline. Optional, black eyeliner instead. Also optional, liquid liner. I'm still trying to get the hang of liquid eyeliner via the felt tip pens I have, hence why I haven't done it.

Finally, used my E.L.F. Volume Plumping Mascara, two coats. I also placed it on my lower lashes as well.


Products Used:
  • Milani Eyeshadow Primer
  • Aura from the Urban Decay Glinda Palette
  • OZ from the Urban Decay Glinda Palette
  • E.L.F. Baked Eyeshadow in Dusk
  • Carbon from MAC
  • Melt My Heart from MAC (LE I believe)
  • Elite Models Intensity Eyeliner in Secret Grey
  • E.L.F. Volume Plumping Mascara
Related Posts Plugin for WordPress, Blogger...