30 June 2013

Quick Post: Eye of the Day Burnt Auburn


I hope everyone had a lovely weekend. I actually lucked out yesterday (if you follow me on twitter, I mentioned this already), while at work, the country club that is virtually (there's a hotel in between) next to the restaurant set off a brilliant display of fireworks! I wanted them from one of the rooms, then ended up being out onto the upper patio to watch them. Best part was that they were setting off the customers' car alarms. Oops!

Anyway! This is another quick post for yesterday's eye of the day! Apparently this was a look that worked well with my eyes, or so I had been told =\ 

This basically consisted me of "winging it" as I knew the main color I wanted to use, but didn't really have anything beyond that planned out. Whoops! I guess it could be considered a happy mistake? :D

Products Used
  • Milani Eyeshadow Primer
  • Auburn from Sally Girl
  • Burnt Plum Baked Eyeshadow from e.l.f.
  • Dalliance Mega Metal Eyeshadow from MAC
  • Sketch from MAC
  • e.l.f. cream eyeliner in Black
  • Urban Decay 24/7 Glide-On Eye Pencil in Rockstar
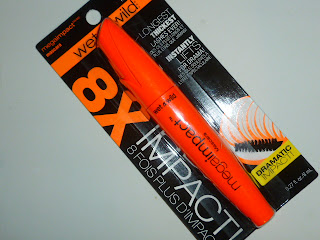
  • Wet n Wild Mega Impact Mascara

Just A Friendly Reminder

I'm sure plenty of you already know, but as of July 1st (tomorrow), Google Reader will be retired (not GFC though). 

Please feel free to continue following me at BlogLovin' from tomorrow, July 1st and onward :)


Follow on Bloglovin

27 June 2013

Press Release: Milani Cosmetics New Limited Edition Nail Collections

Milani Cosmetics New Limited Edition Nail Collections


Milani is happy to announce the launch of two new limited edition nail collections: Fantastical Plumage and Retro Glam. Both collections will be available at select CVS and Meijer stores during the month of August. Please note that some stores might put up the collections before August. Both collections will also be available online at www.milanicosmetics.com.

Milani Cosmetics New Limited Edition Nail Collections

Milani Cosmetics New Limited Edition Nail Collections

26 June 2013

Review: e.l.f. Mineral Infused Face Primer


Primer review time! Round 3 of the primers, they say third time is a charm right? (Don't tell that to where I work though!) This go about it's e.l.f. Mineral Infused Face Primer that is part of the studio line. 

The question is though, is this one my knight in shining primer?

Lets find out!

24 June 2013

Your Preference: Drugstore Nail Polishes vs. High-End Nail Polishes


I'm back with a Your Preference episode! This round it's drugstore vs. high-end nail polishes (or nail lacquer). For the record, I'm not basing this on price, this is solely based on what experiences I've had with polishes, namely the formulas.

I honestly think that this can go either way, namely because of the formulation on either side.

While I haven't had much experience with high-end brands of polishes, I only own MAC (older collections), Butter London and Londontown. In the past (my opinion) MAC polishes can be a hit or miss with the formulas. My Butter London polishes though, are nothing but hits for me. Not to mention Londontown being a hit, which has a post of its own.

As for drugstore, if you open my polish collection (should I do a video on that?), most of them are from the drugstore. I think this is where the scale tips for me in favor of drugstore polishes, because I've had very good experiences with certain brands. Although, I have encountered drugstore brands that are ultimately misses for me (there's one brand that I stay away from because of the polishes I have, each ones has chipped within a day), but hits for others.

I definitely think that there are pros and cons on both sides of this scale, I just lean more towards drugstore because the number of brands that I own, the formulas have worked for me.

So, how about everyone else?
Do you have a preferences between drugstore vs high-end polishes?
Especially based on the formulas?


22 June 2013

Swatch-view: Londontown Lakur Weekend Cheers & Kur Nail Hardener


It's swatch-view time! Can I just say that I was beyond excited when I received these two items in the post from Londontown. Not only did the lovely, Kate sent me their Lakur Enhanced Colour in Weekend Cheers, but also sent me the kur Nail Hardener Base/Top Coat.

 Londontown is a 5-free formula, gluten free, vegan and cruelty free company that focuses on a nail care system that uses more of a holisic approach. Seeing that part of the remedy that is used in their fomulations, vitamins and minerals, I racked my brain to see what all I used, were there any vitamins or minerals in even the base coats I've used in the past? Maybe Gelitan, but that's it.

Currently, my nails break. The main nail to break is actually my left index finger, the outside edge breaks constantly. My nails constantly peel. They weren't always like this though, once upon a time I had strong nails that didn't break or peel. 

Because I'm reviewing a base/top coat and polish that are meant to help strengthen the nails, I feel that adding my history is a must here. But I'm putting it after the jump :D I'll try to keep it short though, as short as I can make it at least.

20 June 2013

Pictorial: Rockstar Venus Eye of The Day


Pictorial time! This one is for the eye of the day that I posted here from June 15th. I've dubbed it Rockstar Venus, I originally was going to dub it Half Baked Rockstar, but I didn't know how that would pan out haha. 

I ever, so slightly made two changes to it, only because I couldn't find one product (it went MIA) and I accidentally grabbed a different mascara. Neither one really make that big of a difference though. 

So lets start!


Step 1. Priming the eye. I used Milani's Eye Primer. Let it dry for thirty seconds (or more), otherwise if you apply shadow too quickly without letting it set, there will be creasing (I learned the hard way when I first tried it).


Step 2. I started off applying Urban Decay Half Baked (mine is from the Get Baked mini palette) to the center of the eye lid, avoiding the outer and inner corner. Then doing the same to below the lower lash line. This is entirely personal preference though. You can take Half Baked or anything close to it all over the eye lid if you want.


Step 3. Next is Urban Decay Rockstar (from the Mariposa palette), starting at the bare area of the outer corner, then blending it into the crease. I actually trailed it along the crease so that it would almost go into the inner corner. This is just something that I like to do when I'm using a gold-ish color, I just use a smaller brush so that it isn't blending into the gold near the inner corner. Back to the outer corner, I slowly start to build up Rockstar and blend it into Half Baked, bringing it closer to the center of the eye lid, but ending it before hit reaches there. And again, bringing Rockstar down to the lower lash line and blending it into the Half Baked that is there.


Step 4. Taking Urban Decay Crave (from Naked Basics), I only blended this into the outer V. Then repeated the same to the lower lash line, only blending it into the very outer corner there.


Step 5. Next is the inner corner! Using Urban Decay Venus (from Naked Basics), I blended this up into Half Baked, and ever so slightly into the edge of Rockstar. Repeating the same process to the lower lash line.

Step 6. (Not Pictured) Blending Walk of Shame, which matches my skin tone, from Rockstar up to the brow bone to get rid of any harshness above the crease. I normally go back and forth between Walk of Shame and Rockstar above the crease in order to get the right amount of smokiness that I want.


Step 7. Lining the eyes. Originally I had used e.l.f. cream eyeliner on the upper lashes, but I couldn't find it, so I just smudged Urban Decay 24/7 Glide-on eyeliner in Rockstar into the lashes, then lined the lower water line with it as well.

Step 8. (not pictured and optional) Curl lashes! I actually did this when I originally did the eye look, but didn't do it with the pictorial.


Step 9. And this is where I grabbed the wrong mascara, no biggie though. I used Maybelline The Falsies Volum'Express Big Eyes Mascara (lower lashes) and Wet n Wild Mega Impact Mascara for the upper lashes (2 coats). And then done!


18 June 2013

Review: Tarte Maracuja Creaseless Concealer


I meant to get this post up yesterday, but I wasn't feeling too well plus I received some bad news.

Anyway! I'm actually posting this from my Nook HD+ :D So, if the format is a little off, I apologize in advance!

This is a review I've been wanting to do, but I was contemplating on doing a comparison between Tarte's Maracuja Creaseless Concealer and another one. I'm still going to do that, just after the reviews.

15 June 2013

Quick Post: Eye of the Day June 15th


This is a quick post like graphic says. I got home late from work, hence why, quick post! :D Good news is, I think I finally figured out how to keep my curls in so that they don't fall. And holy moly, did they stay put! Last time I wore them, which was Thursday, they fell after, roughly, two hours. That's a different post all together though. For now, eyes of the day!

If anyone would like to see a pictorial for this, please let me know! I'll probably do it anyway :D
 

Products used
  • Milani Eyeshadow Primer
  • Venus from Urban Decay (Naked Basics)
  • Half Baked from Urban Decay
  • Rockstar (eyeshadow) from Urban Decay (Mariposa)
  • Crave from Urban Decay (Naked Basics)
  • Walk of Shame from Urban Decay (Naked Basics)
  • e.l.f. cream eyeliner in Black
  • Urban Decay 24/7 Glide-On Eye Pencil in Rockstar
  • Maybelline The Falsies Volum'Express Big Eyes Mascara (lower lashes)
  • Maybelline Volum'Express The Rocket (upper lashes)

13 June 2013

Manicure: Electric Leopard

Quick post before I get ready for work, plus this oh so lovely thunder battle (where are the stone giants?! :O) we're having today.

Can I just say how much I love these three polishes from Ruby Wing? Not so much for when they're in the sun (I'm beginning to think Electric Firefly hates the sun, it doesn't change for me), but because of how bright they are. I wanted to do a quick polish last night (it was 10pm when I started), and just wanted to do an accent nail. So, I tried my hand at a leopard print, first time at doing this one. Took a little over an hour to finish, simply due to drying time on the ring finger (I also smudged it on my right hand which required a do-over ;x).

I also used a different top coat as well, Color Clubs 0-60 Speedy Top Coat, which I can definitely say, is speedy!

Just for the record, for these three polishes, Groupie and Crowd Surf dry the quickest, Electric Firefly takes longer for drying.

Vivid Camera Setting

Natural Camera Setting
 Polishes Used

Base Coat - OPI Nail Envy

Groupie - Four out of five fingers, center of the leopard design.
Electric Firefly - Base on Ring fingers for the leopard design.
Crowd Surf - Outlining for the leopard print.
Top Coat - Color Club 0-60 Speedy Top Coat

11 June 2013

Review: Wet n Wild Mega Impact Mascara


Review time! I actually have a few mascaras that I need to do reviews on, but this one right now is for Wet n Wild Mega Impact Mascara.

Wet n Wild Mega Impact Mascara


I purchased this, I think early May-ish; and being I'm nearly running on E with my other mascara, I've been reaching for this one more often. 

Wet n Wild states that this mascara provides the longest, thickest lashes ever and it instantly lifts for drama. True or False now is the question. Is it true? Or is this mascara a dud?

Review time, a go go!

09 June 2013

Pictorial: Club Naked II


I'm baaack with my pictorials! Haha! This is actually the look I've been wearing on Thursdays when I work the late shift at work. I've actually received quite a few compliments on it as well (there's a SHOCK!). So, instead of doing a step by step from just two photos, I quickly redid the look for a pictorial :D


First before anything, I primed my eyes with Milani Eyeshadow Primer and allowed that to set for 30 seconds.

Next, I used PIXI Shell Sheen in the inner corner, on the upper lid and below as well. Then taking Brun Beam I filled in the rest of the lid, also taking it along the lower lash line.

After that, I used MAC's Club (if you don't have this, I'm not sure, but check out Wet n Wild's Comfort Zone palette, there could be an alternative to use there) all over where I had placed Brun Beam. I took Club slightly into Shell Sheen just so that the inner corner color would have a good transition. I also brought Club up above the crease slightly for the next step...

Taking Naked 2 from Urban Decay's Naked Basics palette, I placed that above the crease as a transition color. I went in with a couple of swipes until I was satisfied with it.

Inner corner time! I used Venus again from the Urban Decay Naked Basics palette. Placing it anywhere that I had placed Shell Sheen, and blending it into Club.

Next, taking an angle brush I used e.l.f.'s Cream Eyeliner in Black to line my upper lash line. Then used Urban Decay 24/7 Glide-On Pencil in Rockstar on my lower water line.

Not pictured is the mascara I used, which is Maybelline's new The Falsies Big Eyes Duo Mascara (review to come!) I also forgot to curl my lashes (d'oh!). Two coats to the upper lashes and one coat to the lower lashes. Then you're done!


Products Used
  • Milani Eyeshadow Primer
  • PIXI Lid Last Shadow Pen in Shell Sheen
  • PIXI Lid Last Shadow Pen in Brun Beam
  • MAC Eyeshadow in Club
  • Naked 2 from Urban Decay Naked Basics
  • Venus from Urban Decay Naked Basics
  • e.l.f. Cream Eyeliner in Black
  • Urban Decay 24/7 Glide-On Pencil in Rockstar
  • Maybelline The Falsies Volum'Express Big Eyes Mascara


07 June 2013

Favorites: May 2013


It's that time again! After a rather hellish day at work (do not get me started, trying to do the om thing and calm myself still), I mentioned previously that I skipped April Favorite because I only had two, and I didn't feel as if that was enough to do an April Favorites.

This time, I actually have more <cue cackling>, plus a non-beauty favorite :O! What could it be?!


Urban Decay Glinda Eyeshadow Palette
Graceful, fearless and bewitchingly beautiful, Glinda is the kind of witch we aspire to be. Inspired by the "good witch" from the upcoming movie OZ: The Great and Powerful, this palette includes shadow colors, eye pencil color and lip color - in short everything you need to create Glinda's spellbinding look, along with countless other looks.
This is THE palette that I have been primarily using through the month of April and May. I've also used it quite a few times in pictorials. I didn't a review on it because I figured everyone has seen it, and probably is tired of the views. But if anyone would like to see a review on here for it, please let me know! I'd be more than happy to do so. 

Urban Decay 24/7 Glide-On Eye Pencil in Rockstar
This waterproof eye pencil delivers smooth, creamy, long-lasting color that glides onto skin without skipping or tugging.
Rockstar came with the Glinda palette, and I have to say I love using this eye liner for smudging and lining my water line more so than black eyeliner. Because it's a eggplant color (deep wine/purple) it tends to make my green eyes pop more than with regular black eyeliner.

Urban Decay Super Saturated High Gloss Lip Color in Glinda
Rich and creamy lipstick with insane amounts of high-gloss shine—all captured in one chubby pencil.
As the color suggests, this was the High Gloss that came with the Glinda Palette, and it is/was exclusive to it as well. Because it's such a neutral color, I love wearing it when I have a smokey eye going on.

Wet n Wild Coverall Cream Foundation in Fair [review]
Glides on weightlessly for sheer-to-medium coverage that’s never heavy, chalky, or dull. Evens out flaws with a silky, semi-matte finish that let’s your skin’s natural luminescence shine through. Contains SPF 15 for the ultimate in anti-aging treatment.
Yes, this is the only foundation that I have been using during the month of May! Actually the one in the photo is nearly finished as well, I ended up getting a back-up once I'm done.

NYX Butter Gloss in Cherry Pie [review]
Add a little more sweetness to your lips with a touch of the Butter Lip Gloss available in 12 scrumptious colors! Get creamy sheer to medium coverage on your lips without that sticky sensation. It’s perfect for every sweet tooth!
Yes, this was in a favorites before and I still love it! For me it's the perfect red that actually works well with my skintone without being over the top.

Physicians Formula Sexy Booster Sexy Glow Blush in Rose [review]
Irresistibly Sexy Blushing Glow: Wear this perfect blend of shimmery blushing tones like lingerie for your face for an instant sexy boost with an alluring blushing glow.
Sexy Boosting Formula: infused with the scent of warm vanilla, "afterglow" illumination and pheromone-mimicking ingredients including clinically tested Androstadienone, Cocoa Extract (aka "the Love Chemical") and ancient aphrodisiac Horny Goatweed to enhance your sexy side.
Besides using a tint a tiny handful of times, this is mainly the only blush I have been using during the month of May, which is odd because I do have other blushes! But I absolutely love this one, not to mention the scent!

Studio Gear Cosmetics Impactfull Pro T.L.S. Mascara [review]
Studio tested, high impact Pro T.L.S. Mascara by Studio Gear THICKENS, LENGTHENS and SEPARATES the lashes, delivering maximum fullness and flare.
I definitely LOVE this mascara. I'm actually not sure, but I think I'm nearly running on E :( I've been using it sparingly since, but I'm honestly gearing up to just purchasing the full size. Although I am leery of that for reasons.


Orly Nail Lacquer in Mayhem Mentality
Take risks. Rock opposites. Start a riot with envy-inciting style. Now is the time to blur the line between energetic and outrageous - with Mash Up, the Summer 2013 collection from ORLY.
Although the formula for Orly polishes do not like my nails (instant chipping), I absolutely ADORE this color. It's like a neon-tangerine color. This was actually my polish to transition from springy colors to hot weather colors. Which certain, nameless folk at work do not like.


Non-Beauty Favorite... Drum Roll

Courtesy of Google
The Hobbit!

Yes, even though I started watching it late May, I have been kicking myself for not watching it sooner. I adored the Lord of the Rings movies, books as well as The Hobbit, but I didn't see the film adaption in the theater when it was released. Definitely something odd for me being I saw Fellowship of the Ring 15 times in theater (I'm quite serious, I have the stubs to prove it! I even dressed up as an elf for The Two Towers :O). And right now, like many of the fans, I'm eagerly awaiting the trailer for Desolation of Smaug! AH! Such a long wait!

Have any May Favorites of your own?
Definitely feel free to share, if you have a blog or even a YouTube, feel free to link to the post/video in the comments, I'll check them out!


06 June 2013

A Minor Interruption... wait what?

 
Yes, a minor interruption, no worries though it's make-up related :)

I wanted to put out there a big congratulations to Red Apple Lipstick! The brand was voted the Best (Gluten Free) Cosmetic Brand during the GFREEK Awards that Delight held.


Not only were they voted Best Cosmetic Brand, but they were also featured in the Women's Health magazine for being Gluten Free.


If you are unfamiliar with this brand, Red Apple Lipstick is a gluten, paraben and cruelty free brand. Not to mention vegan as well. You guys know that if I see paraben free anywhere, I'm there! I definitely felt that this exciting news needed the recognition on the blog. Hope everyone doesn't mind!

Feel free to check out their website @ Red Apple Lipstick for more information.

05 June 2013

Manicure: Neon Madness with Ruby Wing

This will be a quick post featuring my freshly done manicure!

I don't know if it's just me, but taking two and a half hours to finish a manicure, is that normal? ;x Yup, that's how long this one took. I think primarily due to me not knowing what to do with two of the fingers. Not to mention dry time in between. 

This manicure is mostly neon with a very vivid, bright purple, just using three polishes and one nail art polish. I did have most of it planned out, just not the nail art polish. 


The three main colors that I used are all from Ruby Wing; Groupie (neon pink), Electric Firefly (yellow with a subtle teal duochrome), and Crowd Surf (vivid purple). For the white nail art polish I used Bad Chick from Sinful Colors. The three Ruby Wing polishes WILL change color in sun light, so I don't know how this will look in sun light! I'll be finding out tomorrow though :D

When I went to take photos, because of how vivid the purple is, it made my camera go wonky causing the purple and pink to blend together in the photos. So, I had to switch to my natural setting.

Natural camera setting

Thumb

I think I may attempt a video tutorial for this being I now know what I'd change. Not terribly happy with the white on pink, because I would have preferred a vivid purple. But I work with what I have, especially at this time of night!

Now, to work on my May favorites! There should be plenty there, I didn't do an April one because... well... I only had two =\
Related Posts Plugin for WordPress, Blogger...